Intro
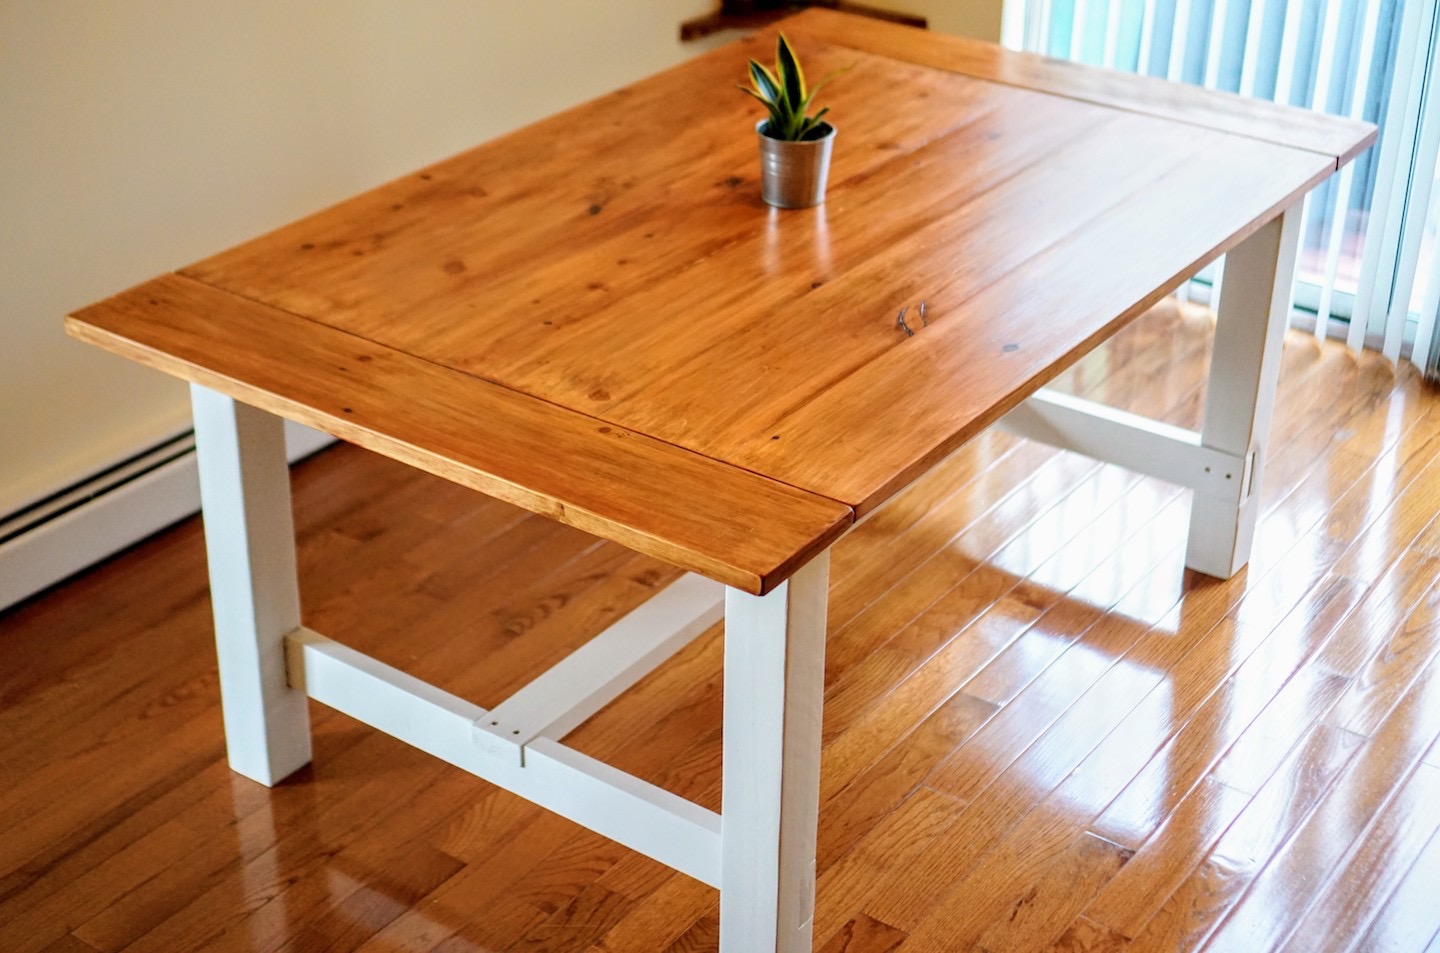
Hi, I'm Steve. My wife and I built this table over the course of about a month, working on it each weekend. We're not professional woodworkers, but decided to do this for the challenge and to be able to look back and say - "we built this." While we have little experience woodworking, we found that building a dining table was completely within reach. So, we hope you find this tutorial helpful, and we'll take your feedback to make it even better. We strongly recommend that you read through the whole tutorial a couple times before starting. Lastly, do not expect perfection. Edges may not meet exactly, the top may not be perfectly flat throughout; and after one year of use and being exposed to the seasons, your table may show slight differences depending on materials used and how well the wood was finished and sealed. Remember, these imperfections are essentially the character of a farmhouse table!
** BE SAFE ** Please follow all safety precautions when working with tools as outlined in their manuals. Some general tips to keep in mind: avoid loose fitting clothing to prevent anything from catching on to equipment, wear closed-toe shoes and safety glasses, use hearing protection when operating loud equipment, disconnect power tools when changing blades and parts, and ensure blades and bits are sharp to avoid kickback and ensure smooth use.
Materials
The Table Components
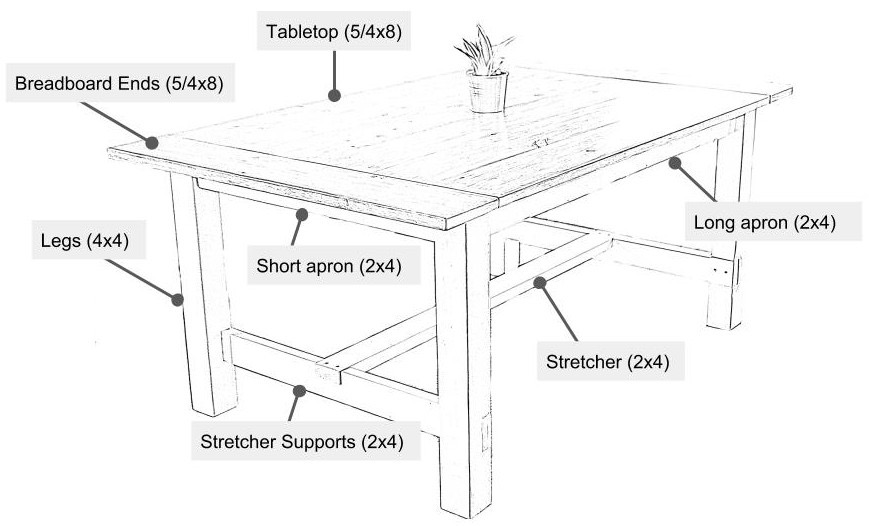
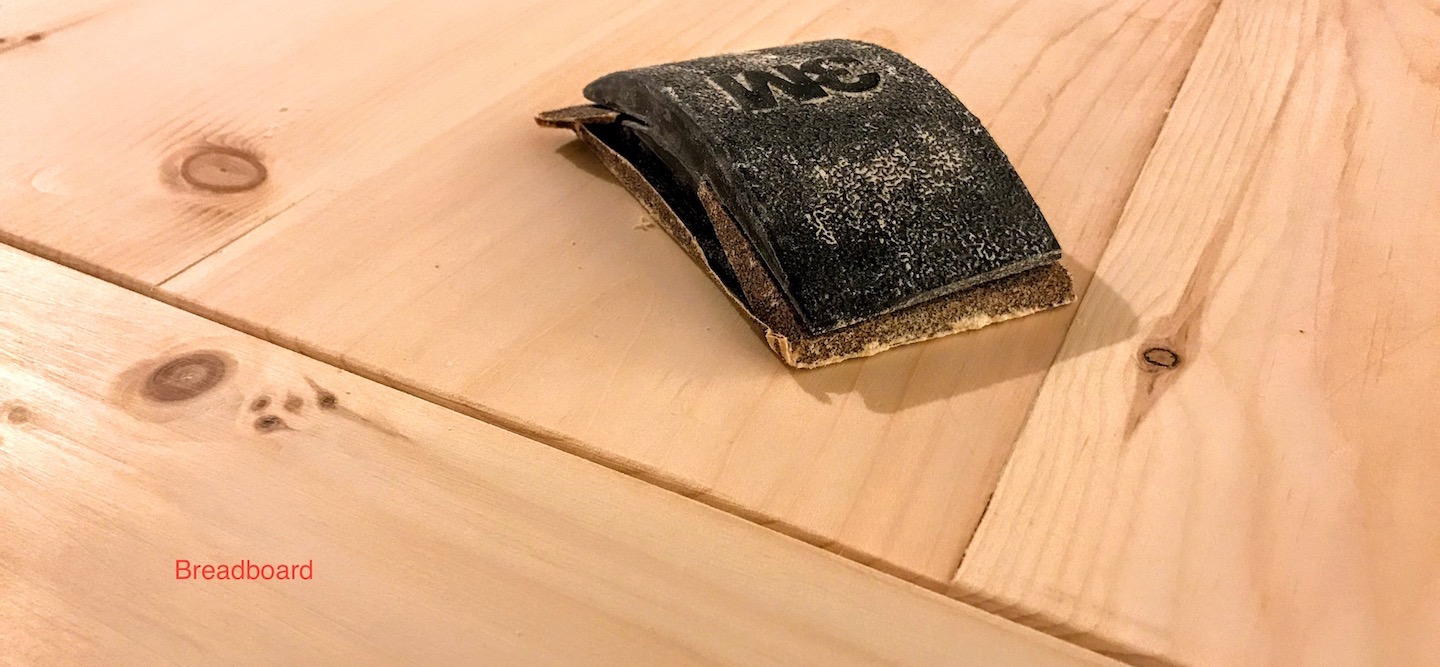
Our farmhouse table consists of the following major parts: 1) Tabletop and 2) Breadboard Ends, 3) Short and Long Aprons, and 4) Legs. Components 1 and 2 complete the tabletop, and components 3 and 4 complete the frame.
The Wood
The wood used for the tabletop is typical kiln-dried common board found at your local Home Depot, Lowes, or lumber yard. As opposed to framing lumber, it does not have a curvature to it, and so it requires much less planing and sanding to achieve a smooth tabletop. The wood used for the frame is kiln-dried framing lumber. Select kiln-dried wood to ensure you are getting material with low moisture content.
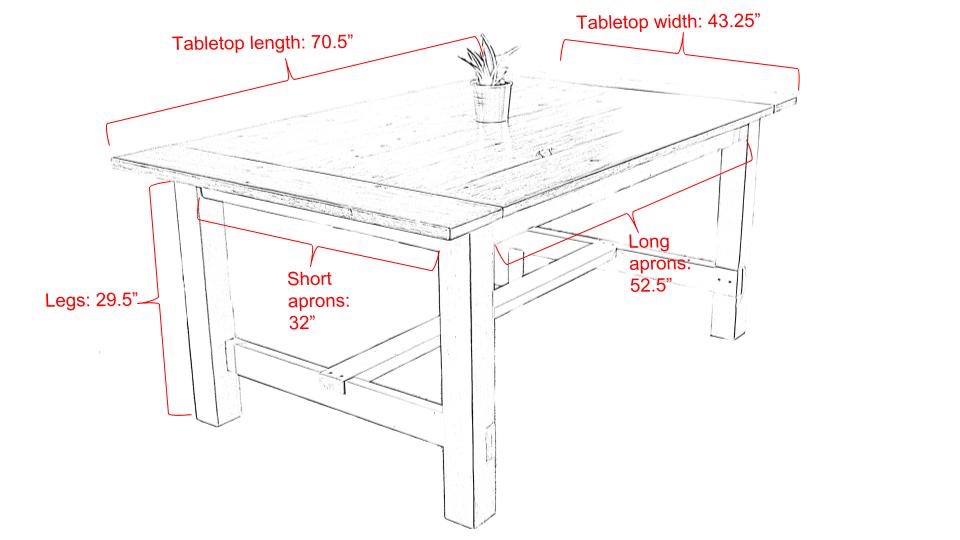
Recommended Measurements
Expect some trial and error. You may realize in the middle of your project that a certain measurement does not work well for you, or that there's a better way of doing something you just finished. This should be fun, so try it again. Use your instinct as well as your head. While not shown here, we also installed a 2x4 toward the middle of the tabletop to provide additional support. This 2x4 is slightly longer than the short aprons and is installed in the same manner as the aprons.
Note that nominal sizes like 2x4 are not actual sizes. So a 2x4 is not 2 in. x 4 in. but instead 1-1/2 in. x 3-1/2 in. and this can be confusing for the beginner and easy to forget as you're working on your table.
Cuts
Now it’s time to create the cut list so you know how much wood to purchase. Remember, that wood sizes at your local store or lumber yard will be referred to in nominal size and not actual size.
Remember:
- Choose straight boards.
- If possible, get a couple extra pieces for each type of wood needed.
- If possible, cut the 4 x 4 wood to length at your local lumber yard or hardware store. If your local shop is unable to cut to size for you, then do it yourself with a circular saw -- cut one end then flip and cut again to finish. We found a 29-1/2" length for the legs to work well.
Tools
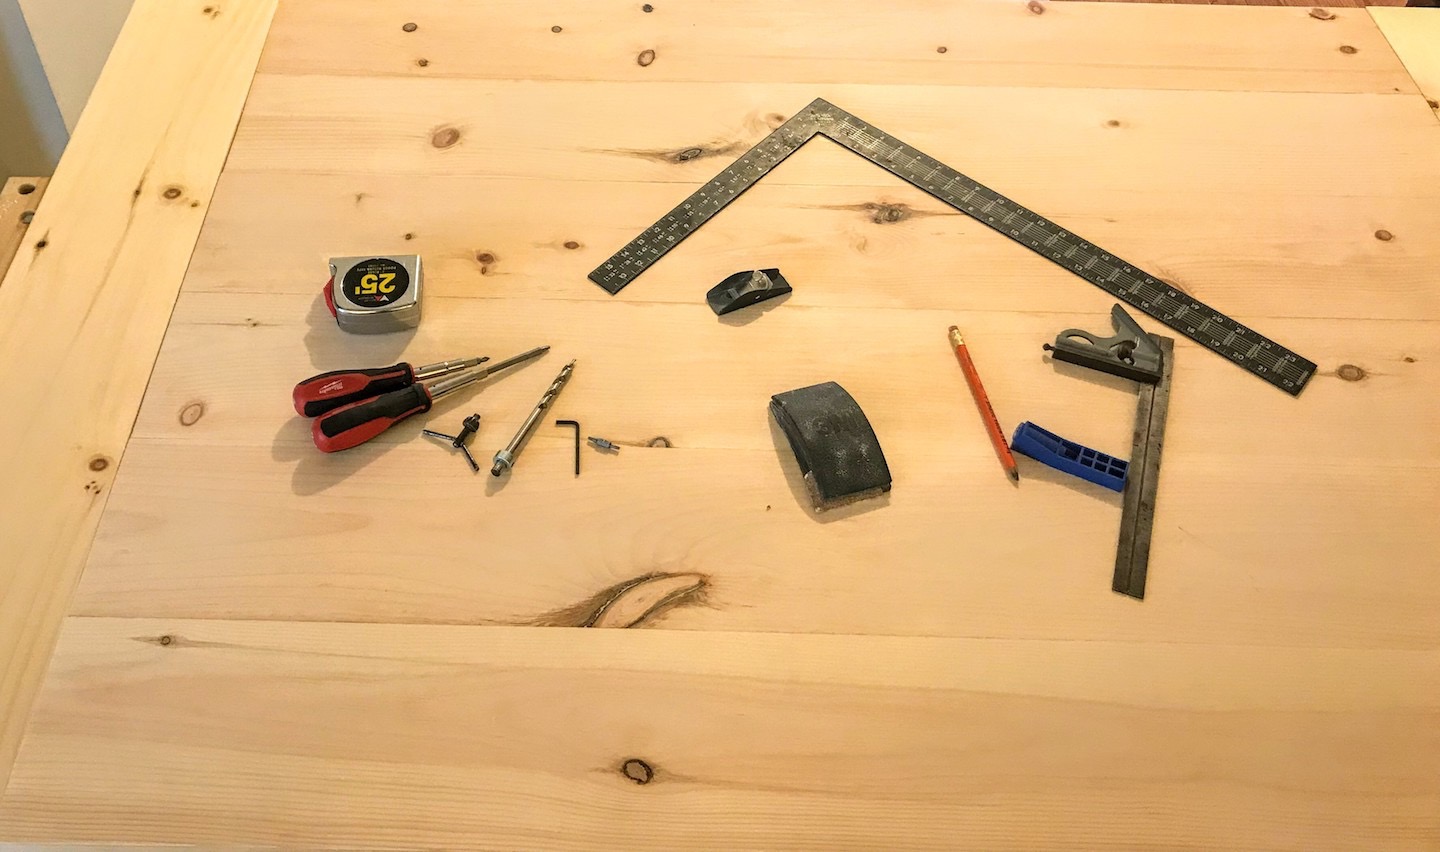
To build this table we only used a few major tools: a circular saw to make cuts, a sander to smooth the wood out, a Kreg Jig to make pocket holes, and power drill to drive screws.
Kreg Jig and Pocket Holes
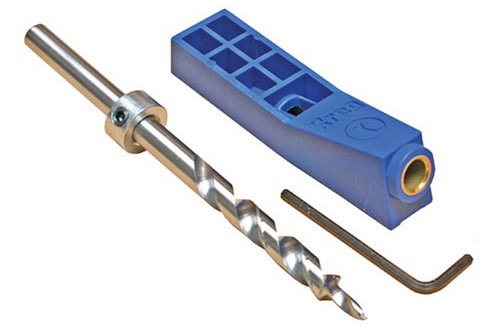
The Kreg Jig is the tool that allows the project to be easily assembled by creating pocket holes into which you will drive pocket hole screws.
The hexagonal wrench is used to adjust the collar depth on the drill bit. The jig will guide your drill to create a hole at an angle to catch adjacent pieces of wood.
Recommended Tools
The below tables contain the tools and materials that we recommend:
| # | Item | Quantity | Purpose |
|---|---|---|---|
| 1 | 3 in. screws | ~ Dozen | Frame |
| 2 | 2-1/2″ pocket hole screws | Pack of 50 | Tabletop |
| 3 | 2″ pocket hole screws | Pack of 50 | Tabletop |
| 4 | 1-1/2″ pocket hole screws | Pack of 50 | Tabletop |
| 5 | Figure-eight fasteners | ~ Dozen | Tabletop |
| 6 | 8" x 7/8" mending plates | Pack of 4 | Tabletop |
| 7 | Pre-stain wood conditioner | 1 quart | To prepare the tabletop prior to staining |
| 8 | Paint | 1 quart | For the frame, if preferred |
| 9 | Stain | 1 quart | For the tabletop |
| 10 | Polyurethane | 1 quart | Protective finish for tabletop |
| # | Tool | Note |
|---|---|---|
| 1 | Workbench | Make sure it's sturdy |
| 2 | Circular Saw | With depth of cut at least 1-1/2" |
| 3 | Power drill | That can take 3/8-inch drill bit |
| 4 | Power sander * | With dust port |
| 5 | Sanding block | Make sure it's comfortable to hold, you will be using this a lot |
| 5 | Sand paper | Get a variety from at least 80 and 120 grit |
| 6 | Kreg Jig | Creates pocket holes |
| 7 | Tape measure | Measure twice, cut once |
| 8 | Square | A large one |
| 9 | Level | A large and small one |
* If you are building this table in-place, connect a vacuum to the built-in port for dust collection.
10 Steps
Take it step by step:
| Step | Activity | Estimated Time |
|---|---|---|
| 1 | Assemble the tabletop | 1 day |
| 2 | Sand the frame | 1/2 day |
| 3 | Notch | 1/2 day |
| 4 | Assemble the frame | 1 day |
| 5 | Attach the breadboards | 2 hours |
| 6 | Sand the tabletop | 1/2 day |
| 7 | Paint the frame and stain the tabletop | 2 Days (includes drying time in between coats) |
| 8 | Prepare the frame for a "floating" tabletop | 1/2 day |
| 9 | Attach the tabletop to the frame | 1 hour |
| 10 | Finishing | 1/2 day |
Let's Begin!
Step 1. Assemble the tabletop.
Make your cuts, if you have not done so already. We first assemble the tabletop so that the glue can dry while we work on the other steps. We will edge-glue the boards together, essentially creating one piece, and we'll use pocket screws to hold it together while it dries. You can take the screws out afterwards, or you can leave them in for additional support.
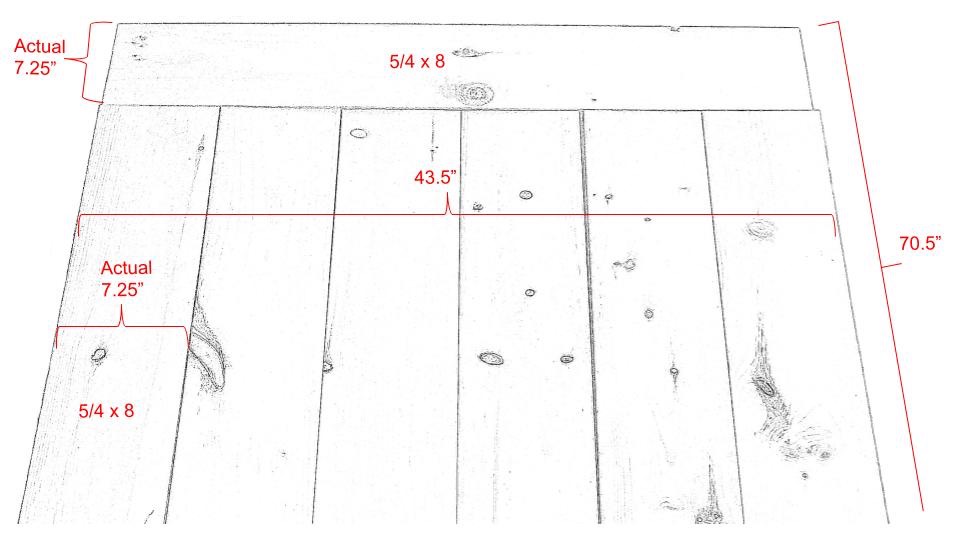
Gather your 5/4 x 8 pieces and put them together on a flat surface. Ensure that all pieces are straight and fit together well. Sanding will later take care of any minor imperfections, but replace any pieces that do not fit well.
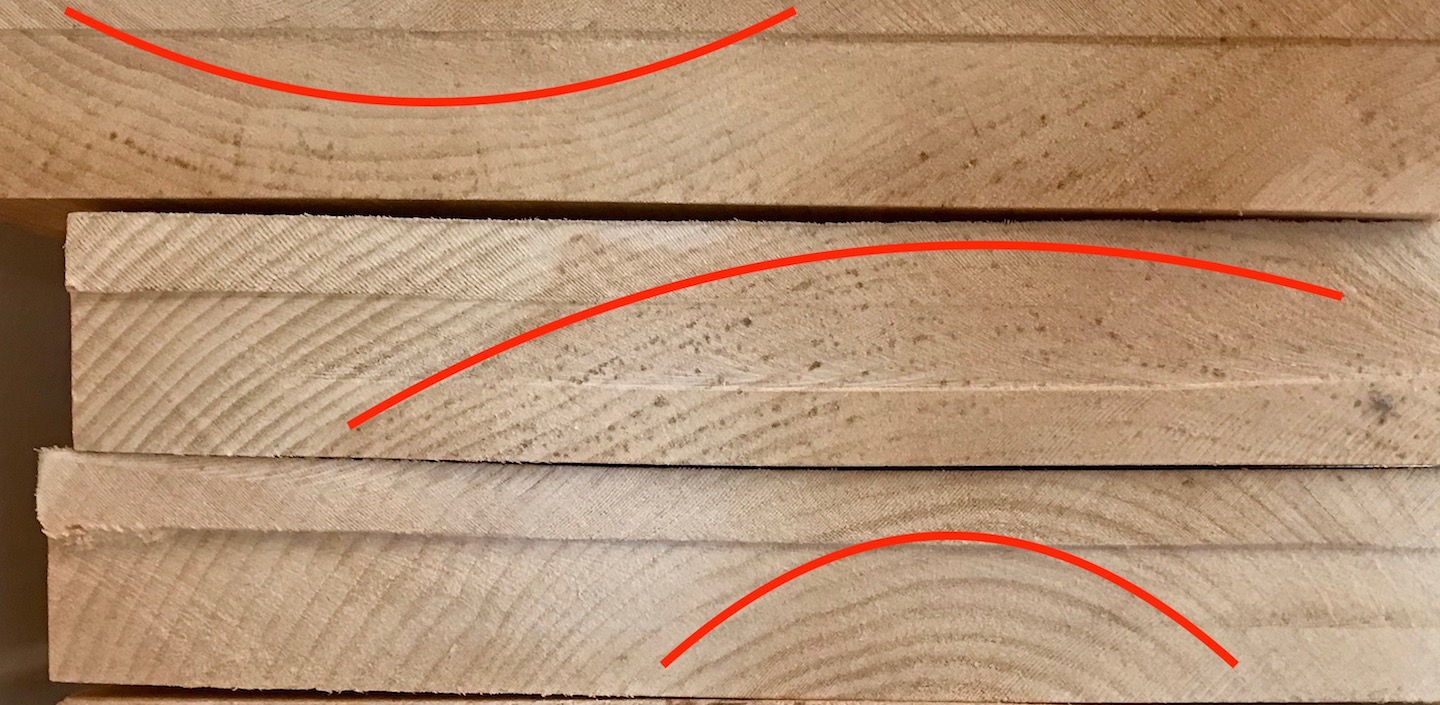
Remember that wood is affected by humidity and will expand and contract depending on humidity. The movement happens in the opposite direction of the growth rings. To compensate for this, you should alternate the direction of the growth rings. This is how you can see the growth rings:
A close-up of the growth rings:
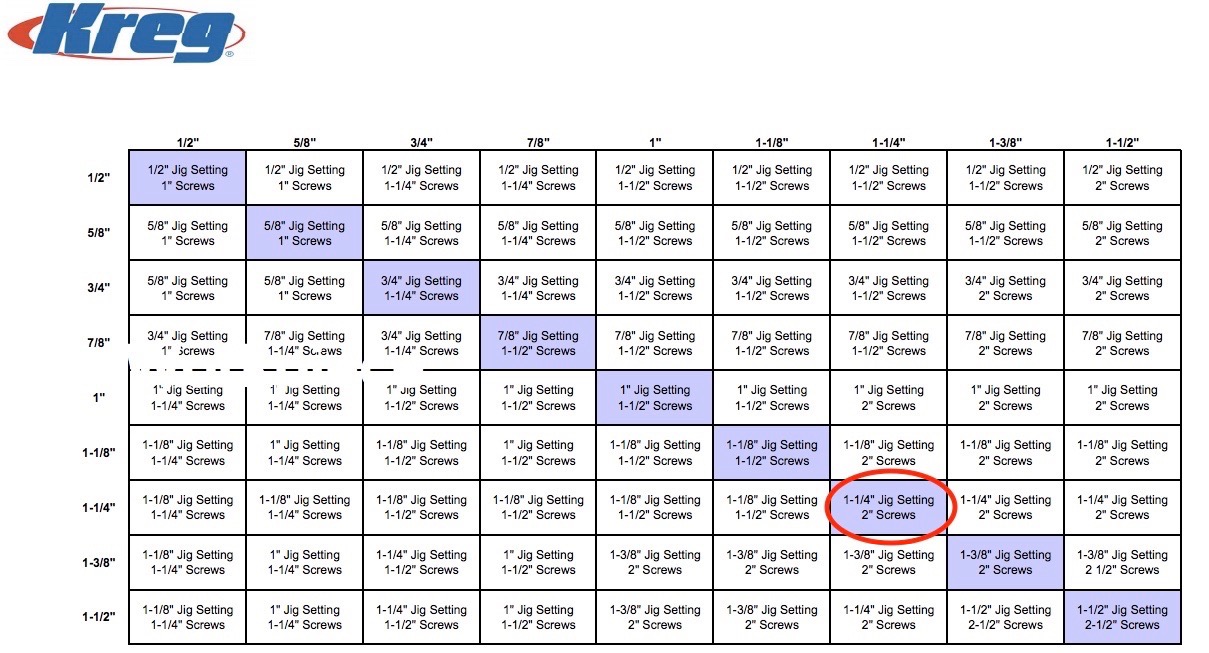
For the Kreg Jig, use a 1-1/4" Jig Setting with 4” collar depth. We get the jig setting and the screws to use from this chart, by finding the box intersecting the column and row for joining a 1-1/4" board to another 1-1/4" board. Remember, our tabletop boards are 5/4" (or 1-1/4") thick:
Gather the following: Power drill, Kreg Jig, 2" Pocket screws, Wood glue.
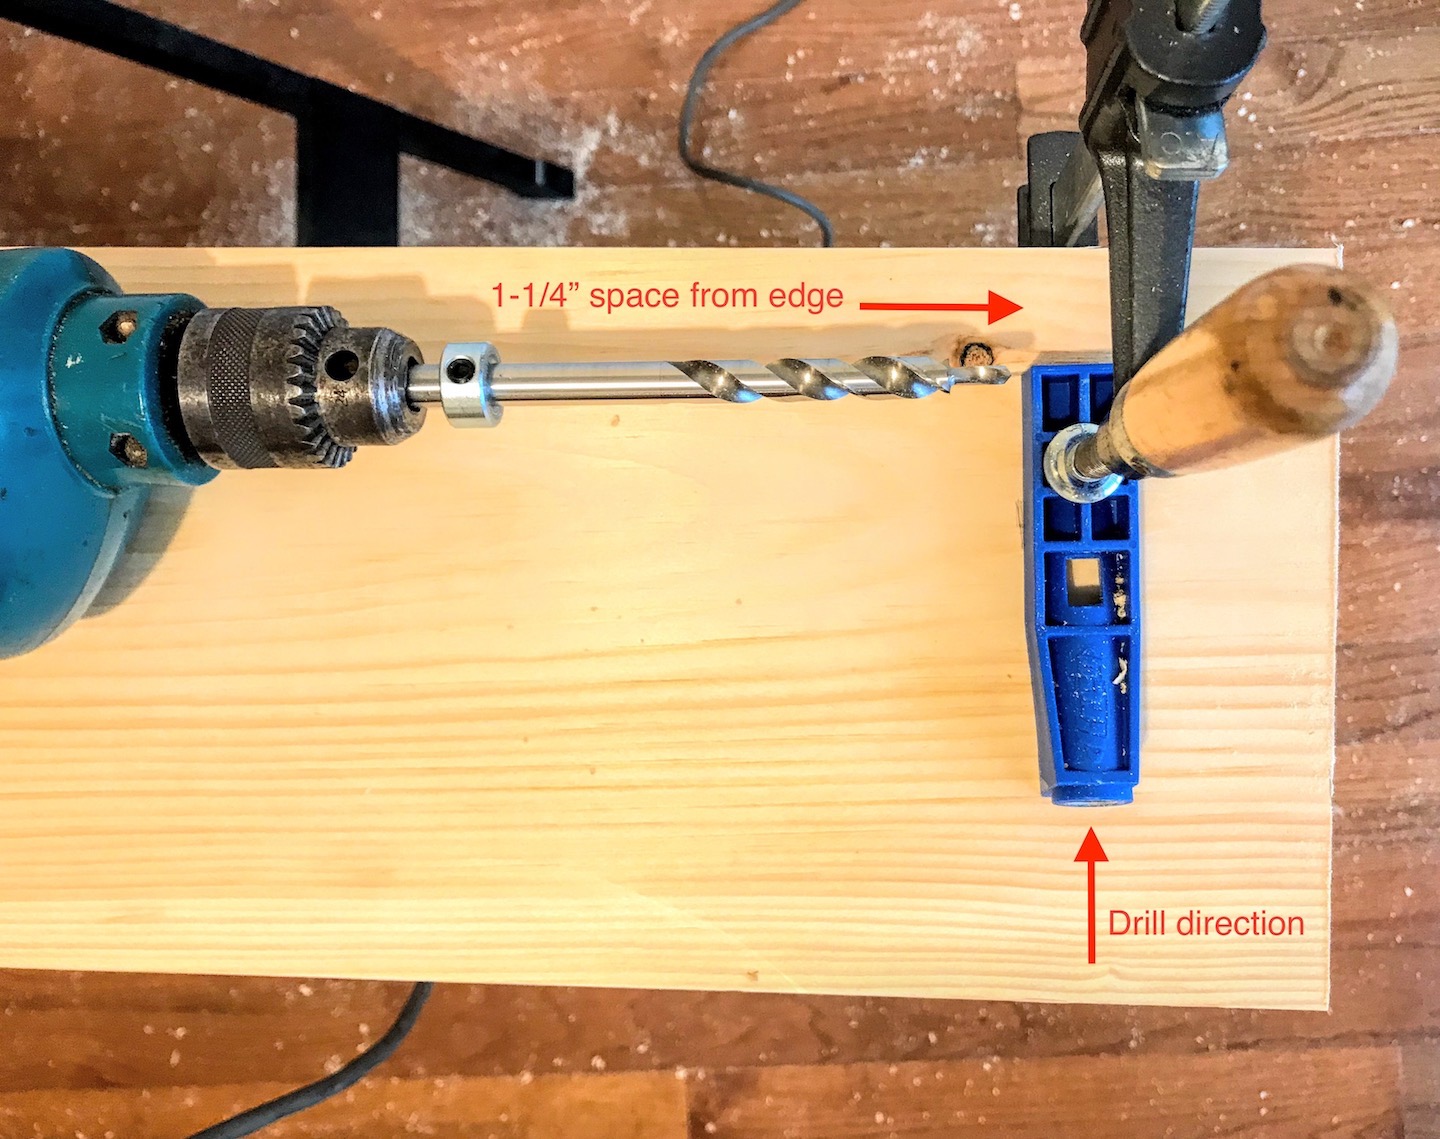
Clamp the Kreg Jig 1-1/4" from the edge of a board so that you just barely drill through the edge of the wood. Try this first on a test piece to ensure it works for your selection of wood and that the screw does not come out the other end (which will be the top of your table). This is what we are doing:
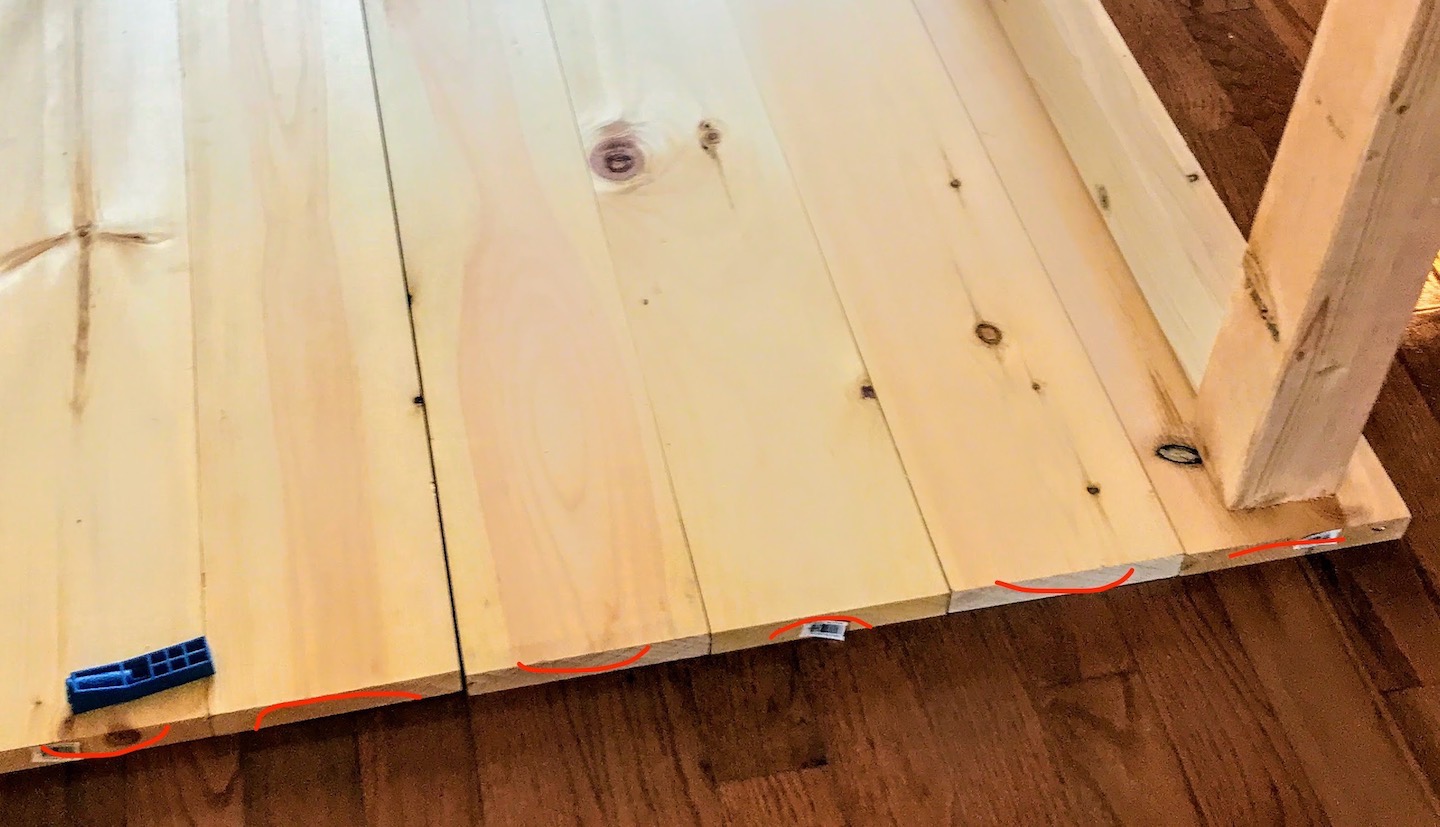
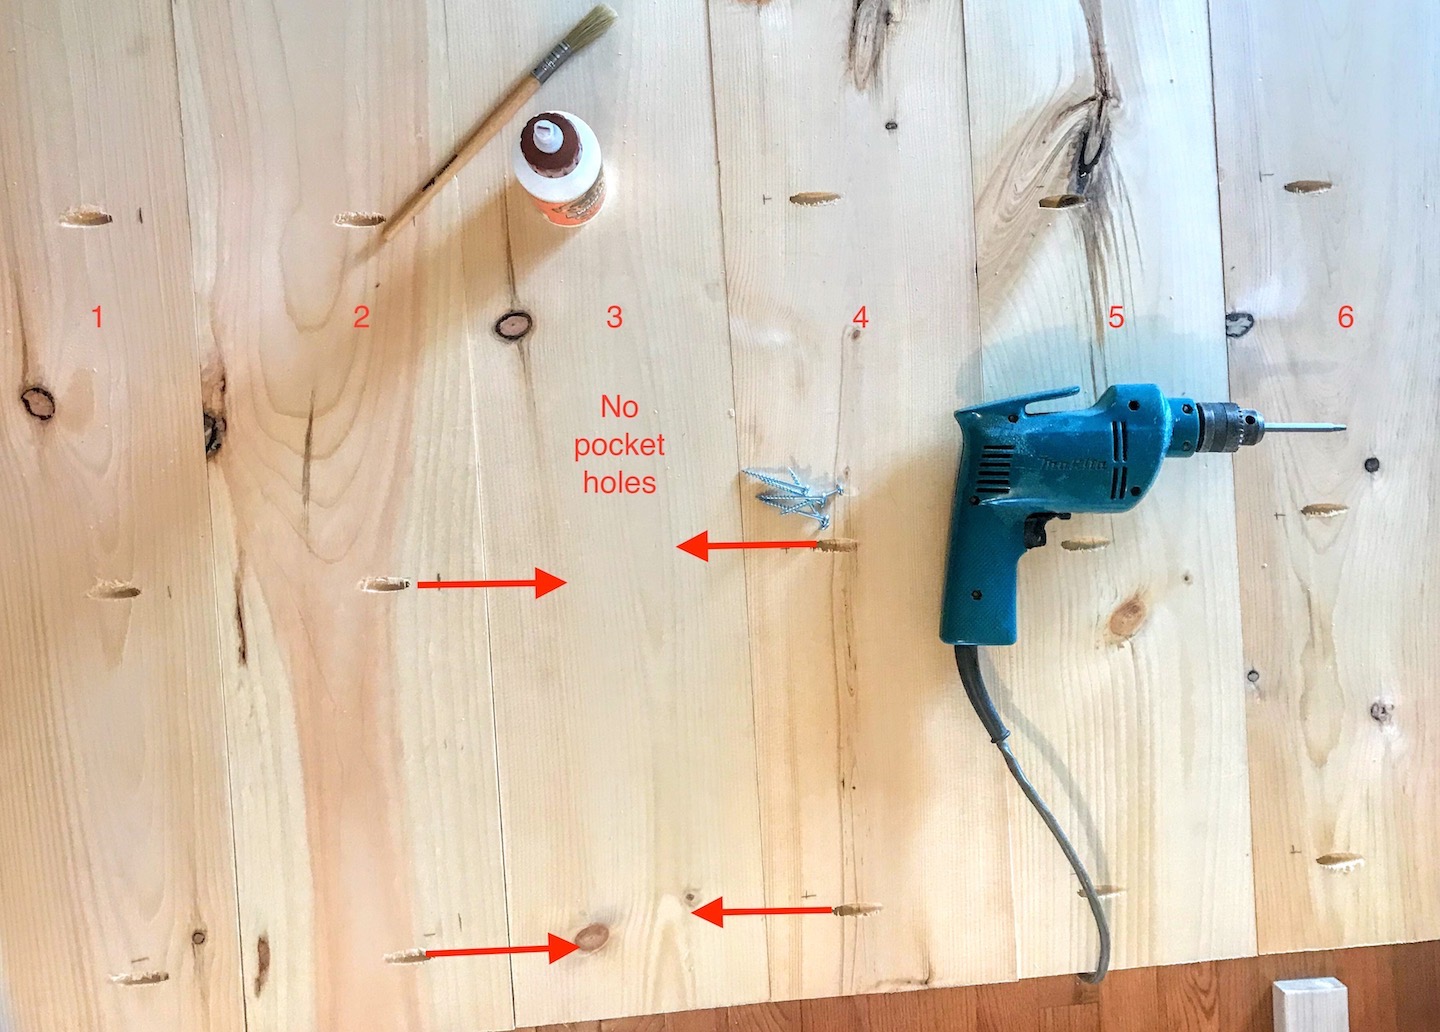
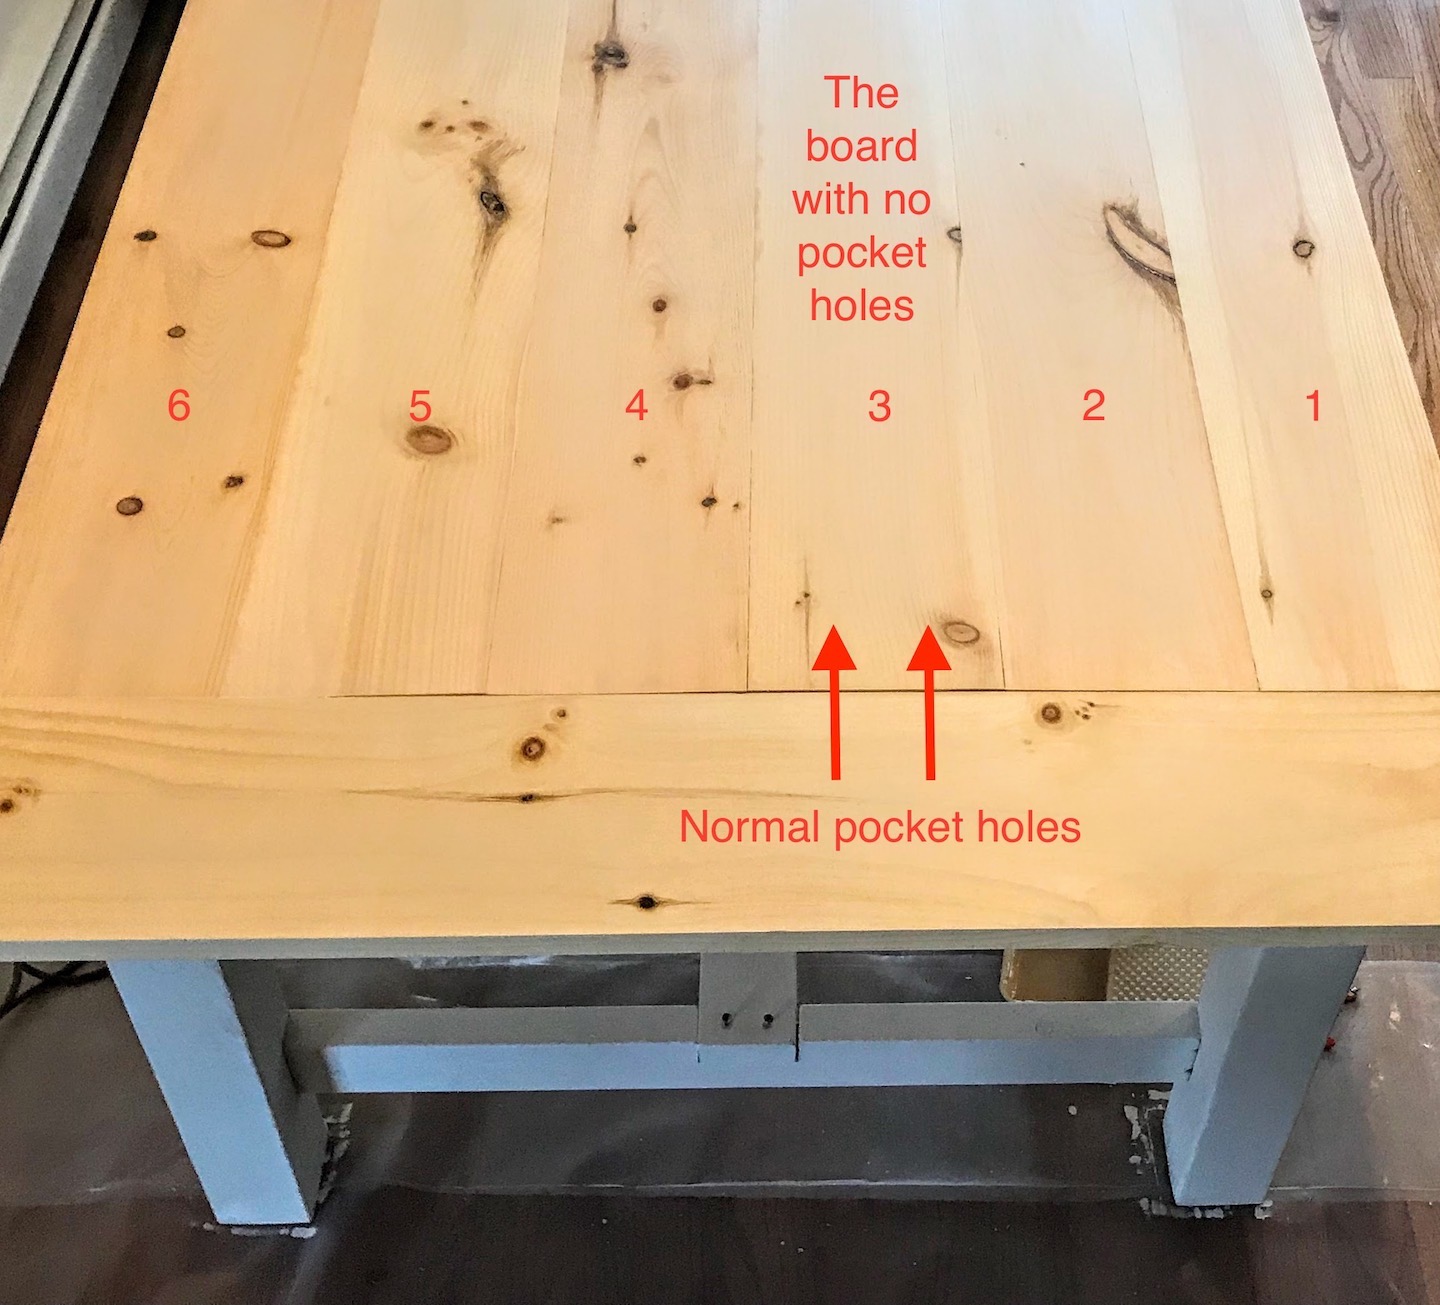
You will drill pocket holes about every 10 inches or so along the length. One of the boards will have no holes as shown below:
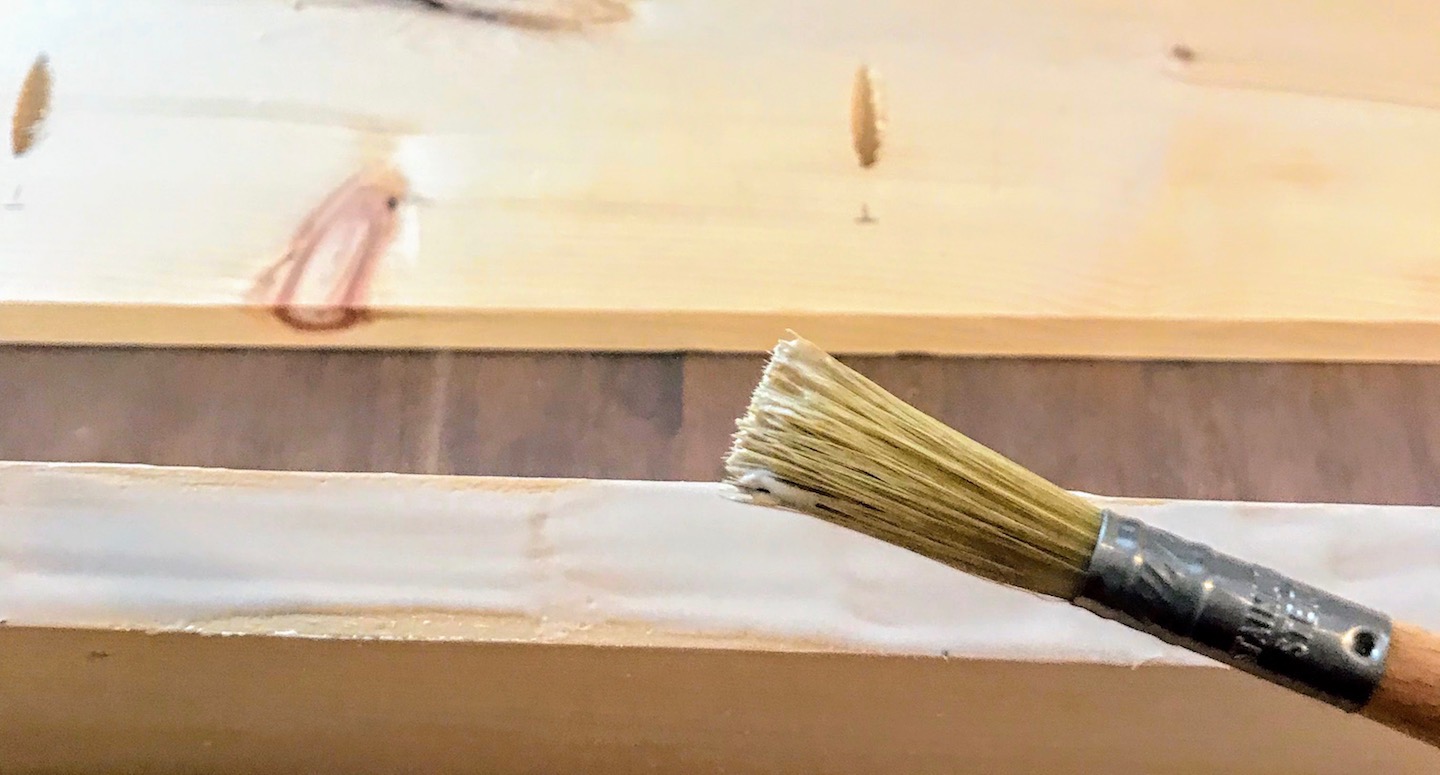
Before screwing the boards together, apply glue along the edges using a brush, and use clamps to keep the boards together and flat while drilling the pocket screws into each hole. Wipe off any excess glue well, otherwise it will be difficult to stain over it later.
At this point, your tabletop is assembled. Let it dry overnight before sanding. In the meantime, there is plenty more to do!

Step 2. Sand the frame.
Prior to assembling the frame, give each piece of wood a good sanding. Start with 80 grit, followed by 120 grit. Always sand in the direction of the grain to avoid scratch marks. Sanding can be accomplished either manually or with a power sander. If possible, choose a power sander with a vacuum port to collect dust. Also, while we did not use a planer, doing so can potentially save time and create a more level surface. Whichever method you choose, sand until the wood is smooth.
Step 3. Notching.
Start by notching the 4x4s and 2x4s in order to attach the strecher supports and stretcher. There will be six notches total. One notch for each 4x4 and one notch per stretcher support.
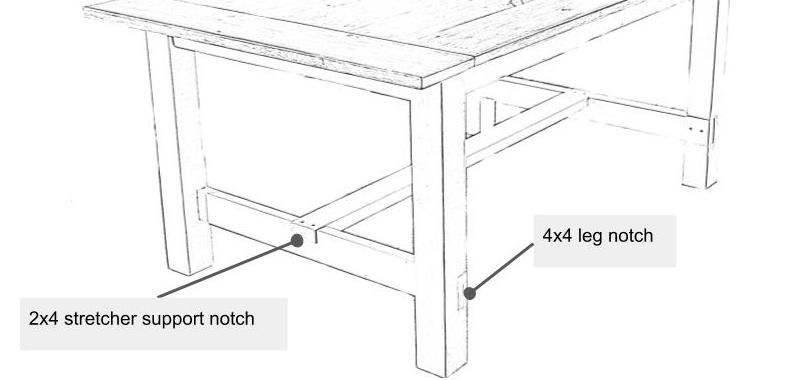
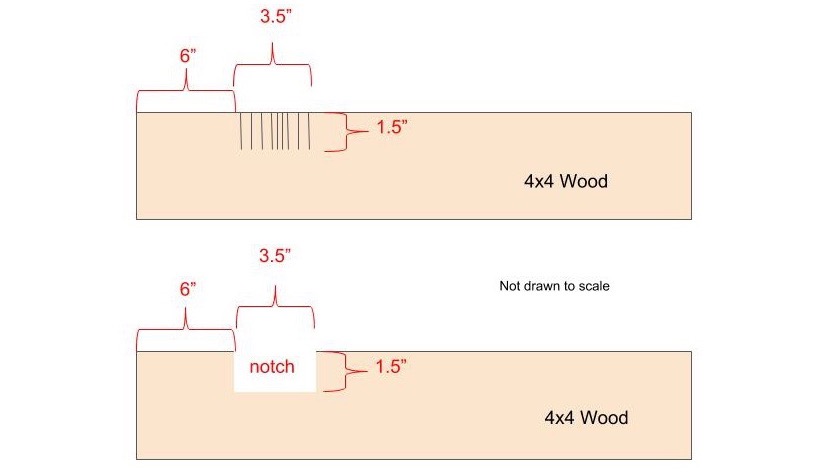
To create the notches, take a circular saw set to the correct depth of 1-1/2", and first make a cut on each end of the 3-1/2 length. Then, make several cuts in the middle along the length. Take a chisel and hammer to punch out the pieces in between, leaving the notch.
For the 4x4s, set your circular saw to a depth of 1-1/2" and make several cuts along the 3-1/2" length -- be sure to start the notch at the same place for each 4x4, otherwise the stretcher support will not be level. We notched about 6" from the bottom.
For notching the stretcher supports, use the same concept of a 1-1/2" depth and 3-1/2" length, but be sure to notch in the center of the stretcher support. This is where the stretcher will sit and it must be centered with the table.
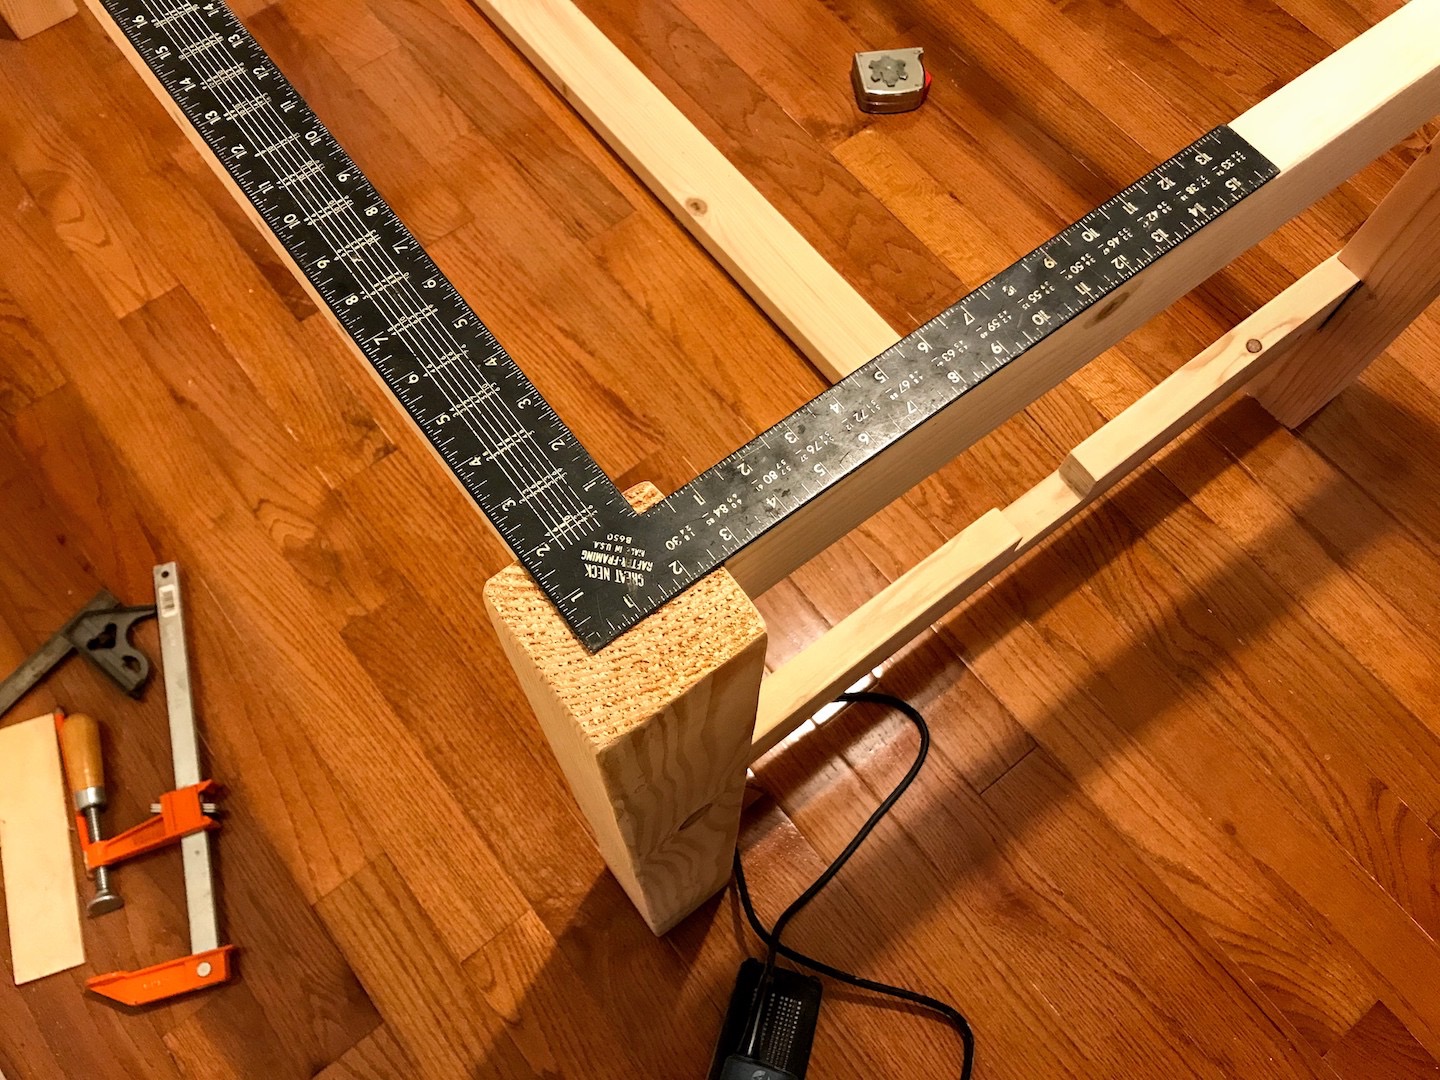
Step 4. Assemble the frame.
The frame is assembled primarily using pocket screws. Be sure to check that everything is square each step of the way.
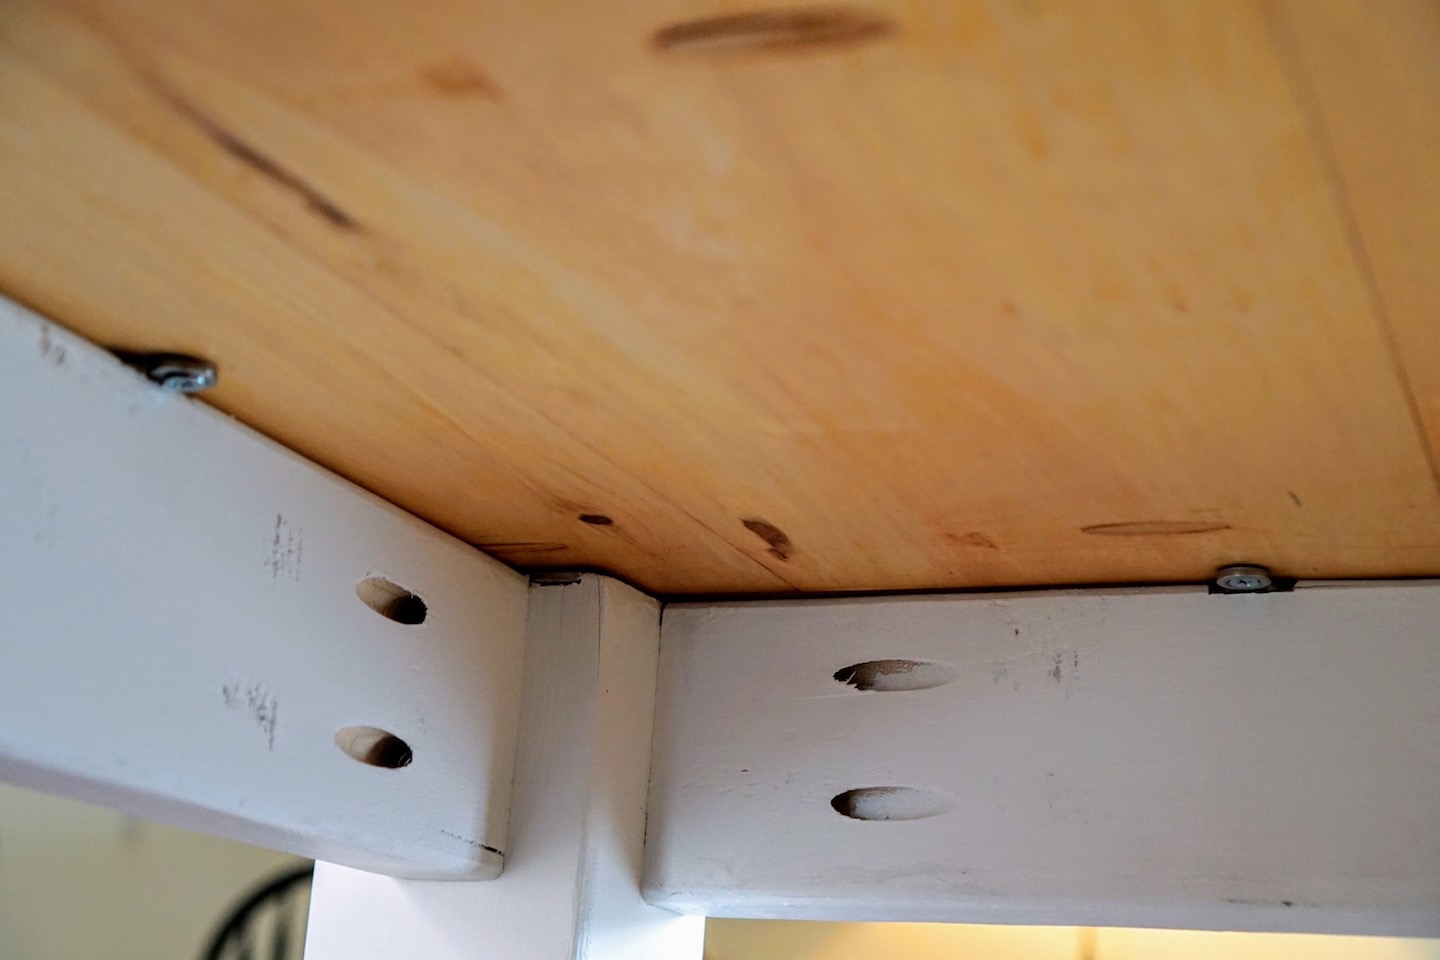
Attach the short and long aprons to the legs using pocket screws. Have the holes face toward the inside of the table to avoid seeing them, although Kreg Jig does offer pocket hole plugs: click here. This time, we set the Kreg Jig collar depth to 4-1/4" and use the 2-1/2" screws. Set the Kreg Jig 1-1/2" from the edge of the apron and drill two holes side-by-side.
After attaching all 4 aprons, install an additional support for the tabletop by attaching a 2x4 toward the center of the frame for the tabletop to sit upon. You can use pocketholes to attach it to the long aprons.
Attach the stretcher supports to the 4x4s using the regular 3" screws.
Be sure to check that everything is square:

Step 5. Attach the breadboards to the tabletop.
Expert woodworkers seem to agree that it is ideal to create a "floating" tabletop to allow for wood movement throughout the seasons as humidity changes. However, most tutorials we find online do not suggest the need for a "floating" top. So, you can choose to attach the breadboards by simply drilling pocket holes from the breadboard end and into each of the six tabletop boards, or, you can attempt a "floating top" -- which is not as difficult as it sounds.
For the floating top, you can follow these instructions (found on page 33 of the Kreg Jig instruction manual): First, adjust your depth collar on the drill bit so you barely drill through the edge of the breadboard. This will create a larger pilot hole for the screw shank and will create the effect of a “floating top”. Secondly, drive the screw into the top until tightened, then back off 1/4 of a turn. This will allow for plenty of expansion and contraction of the wood.
Try this Kreg Jig setting on a test piece:
- 4-1/2" Kreg Jig depth collar setting
- 1-1/4" pocket screws
Note: although not mentioned in the Kreg Jig settings, we recommend attaching the breadboard to the "center" tabletop board normally -- using the same Kreg Jig settings as was used previously to attach the six tabletop boards. This gives some additional stability. This will still allow the tabletop to expand and contract, even though the center board is securely fixed. In our case, the center is board #3 and remember to drill on the underside of the table.
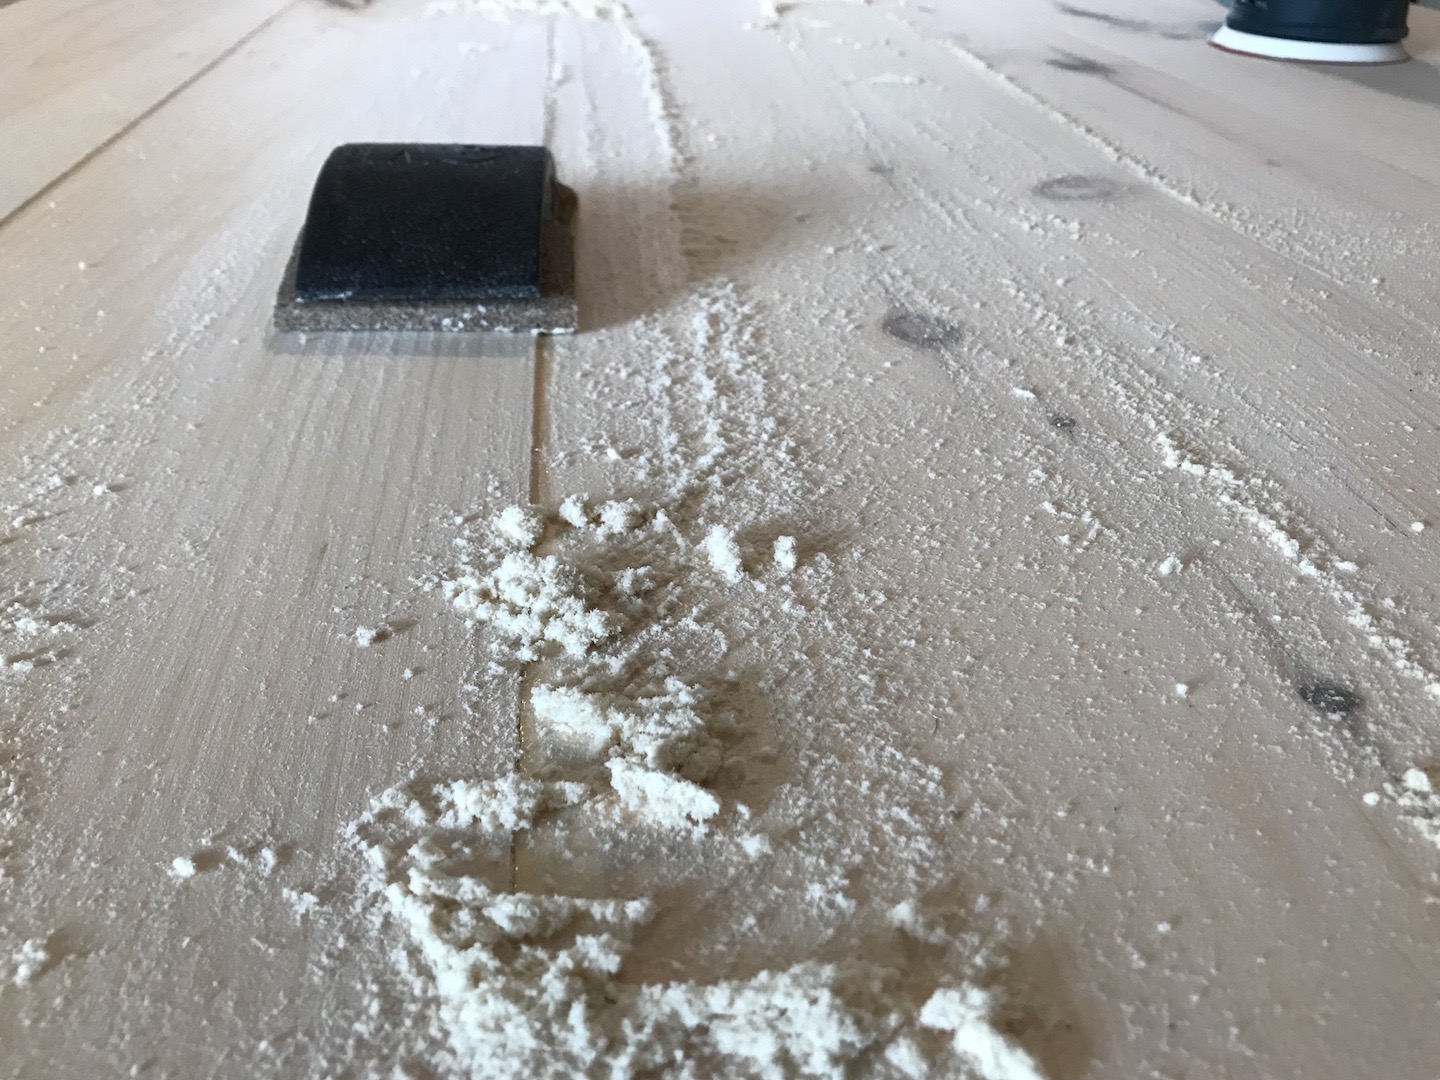
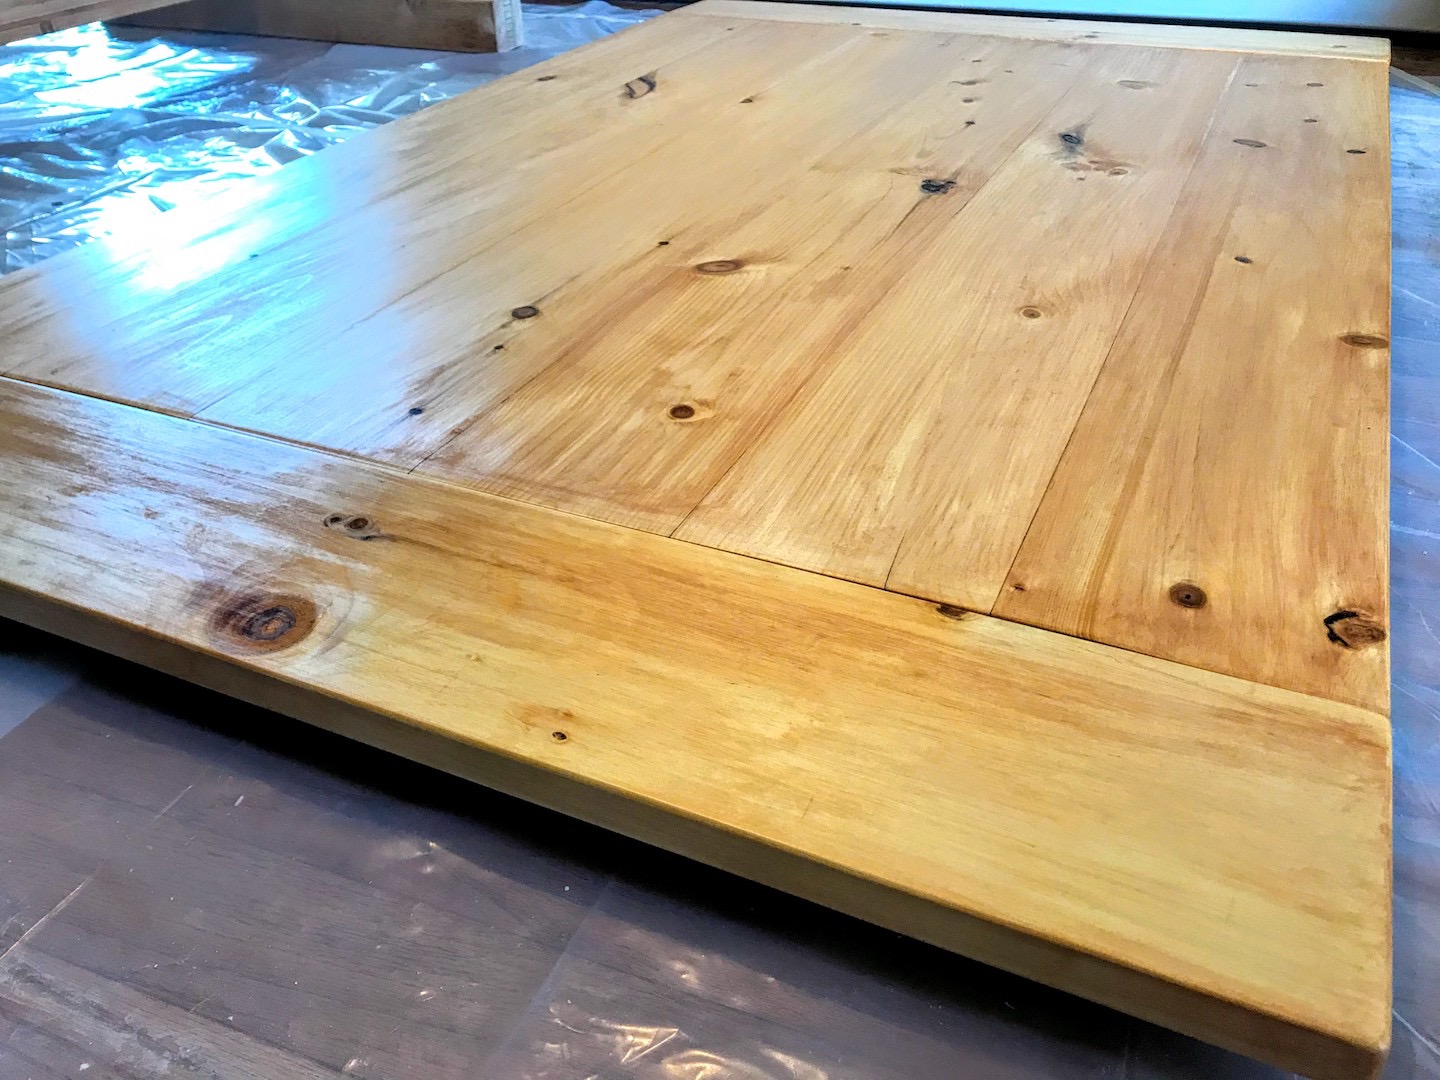
Step 6. Sand the tabletop.
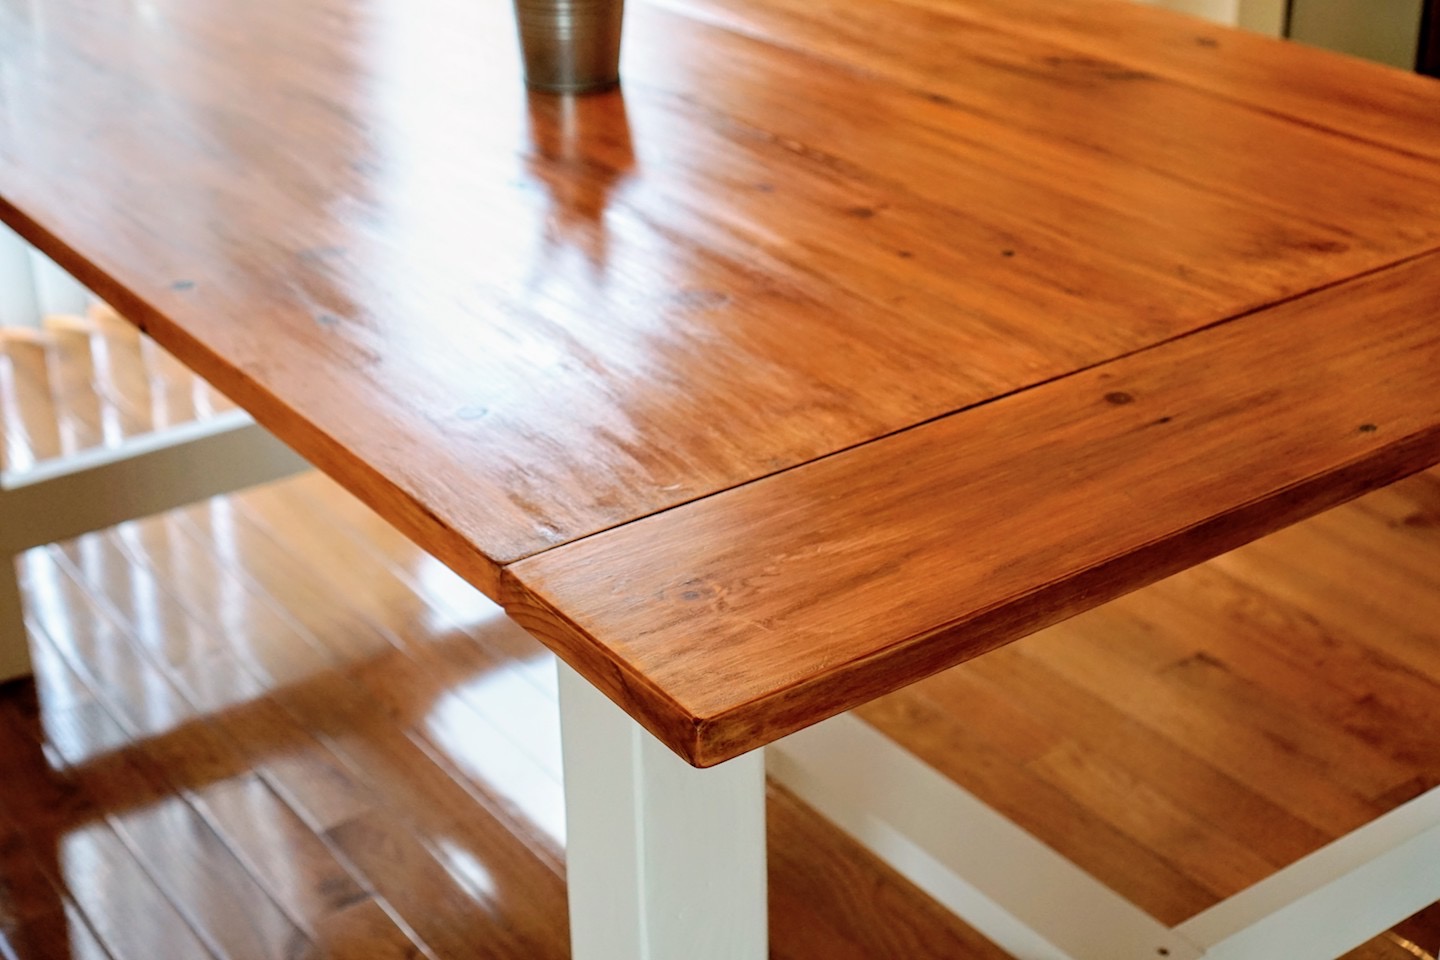
Give the tabletop a good sanding to achieve a nice smooth surface. Test that your surface is level throughout to ensure you're sanding evenly. You can use a power sander to help make this process faster. For the interface between the breadboards and the tabletop, you can sand a bit on each edge to create a v-notch effect. This is only for aesthetic reasons:

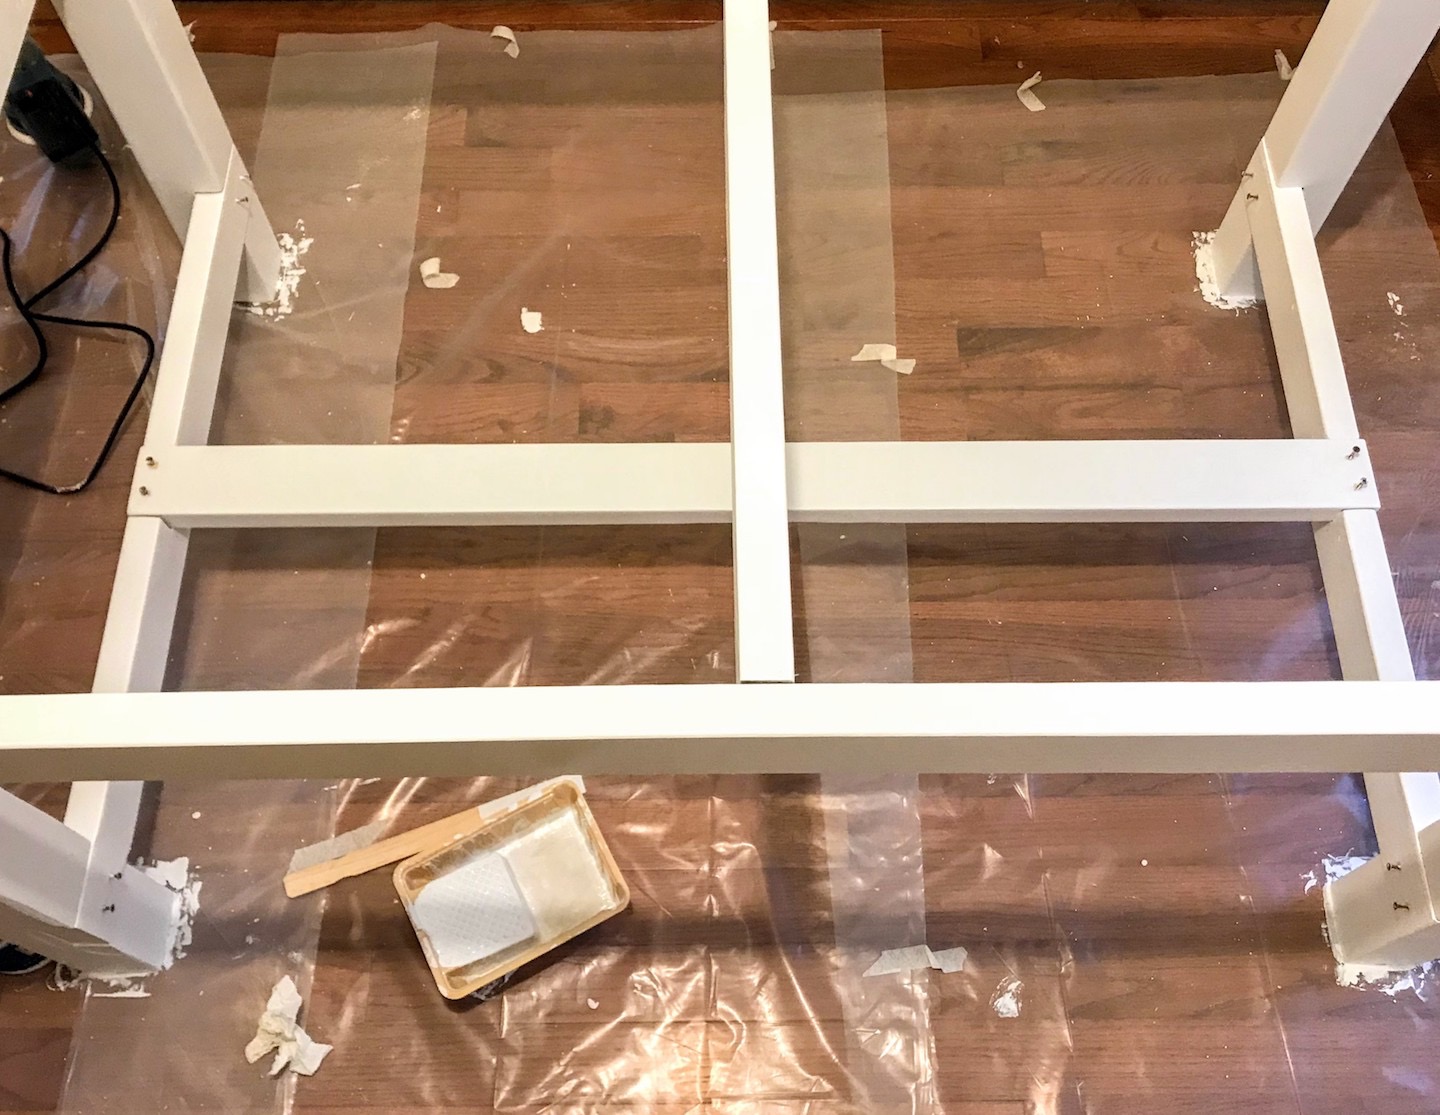
Step 7. Paint the frame and stain the tabletop.
Now apply your favorite paint and/or stain to the frame and tabletop. We used an eggshell white paint for the legs, applied using a roller to get a smooth texture.
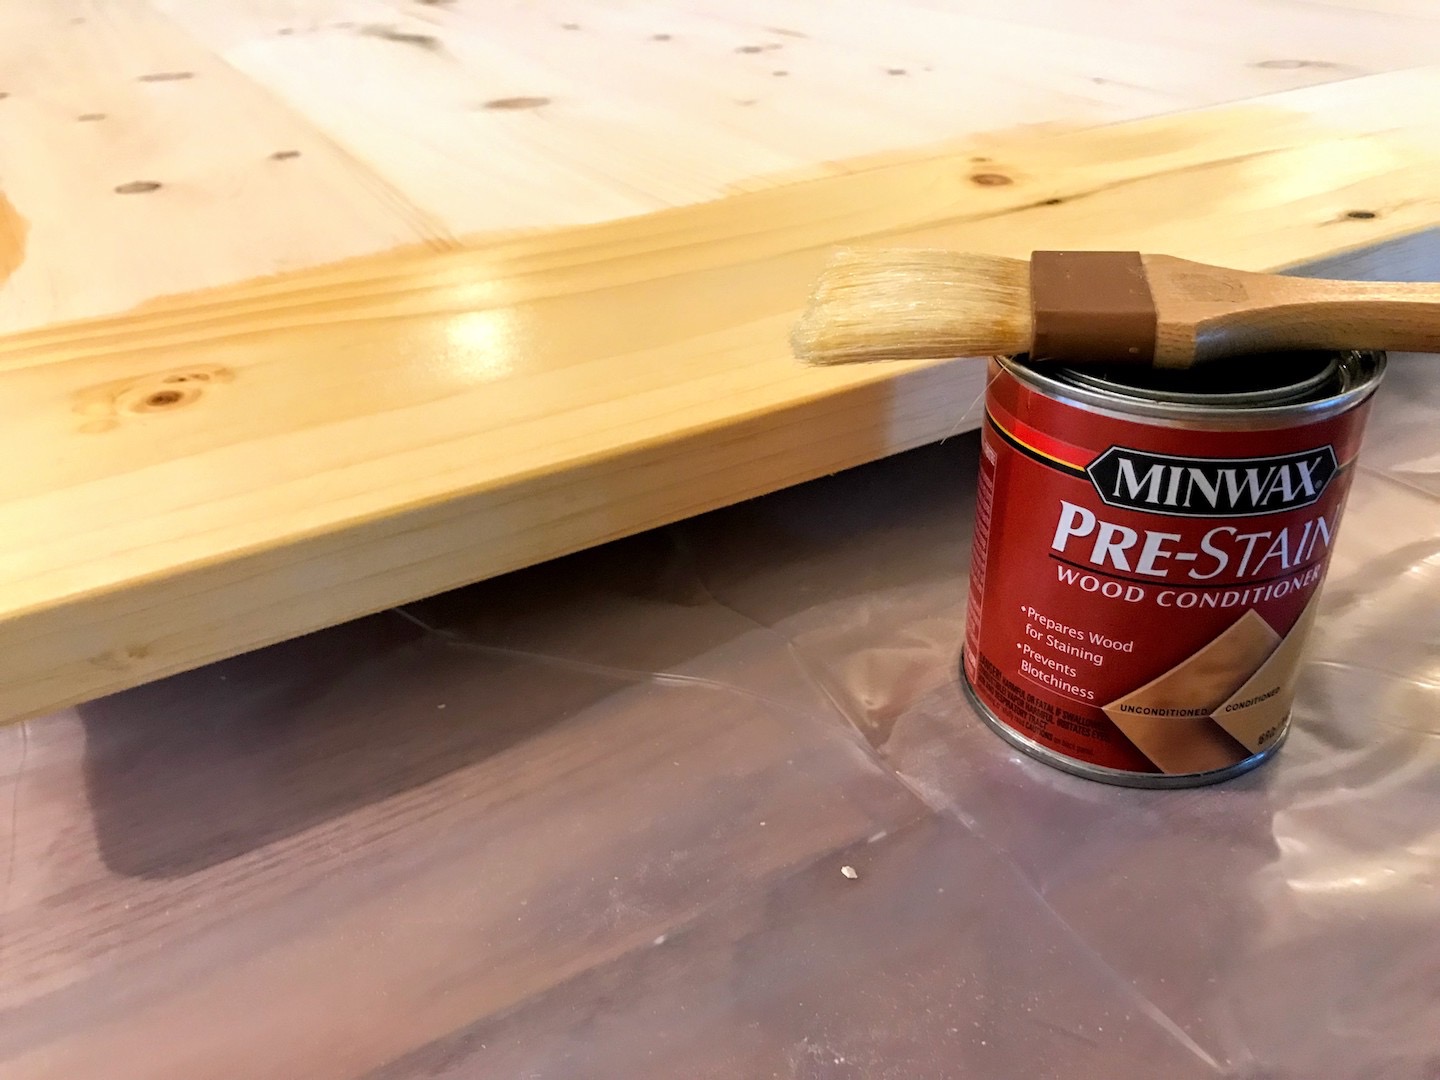
For stain, we recommend applying using an old cotton t-shirt instead of a brush to reduce blotching and make it easier to apply. Remember to remove the breadboards temporarily so that you can stain them on all sides. Also, since we are working with softwoods that readily take stain, start by applying a pre-conditioner to get the wood ready to take stain uniformly and prevent blotching.
You may have to apply a few coats of stain to get your desired color, so keep that in mind for timing as it needs to dry before applying the next coat. While the paint and stain dry, you can move on to the next step.
Ideally, you will also finish the breadboards and tabletop now with a polyurethane finish in order to get it on all sides. See the Finishing section for more details.
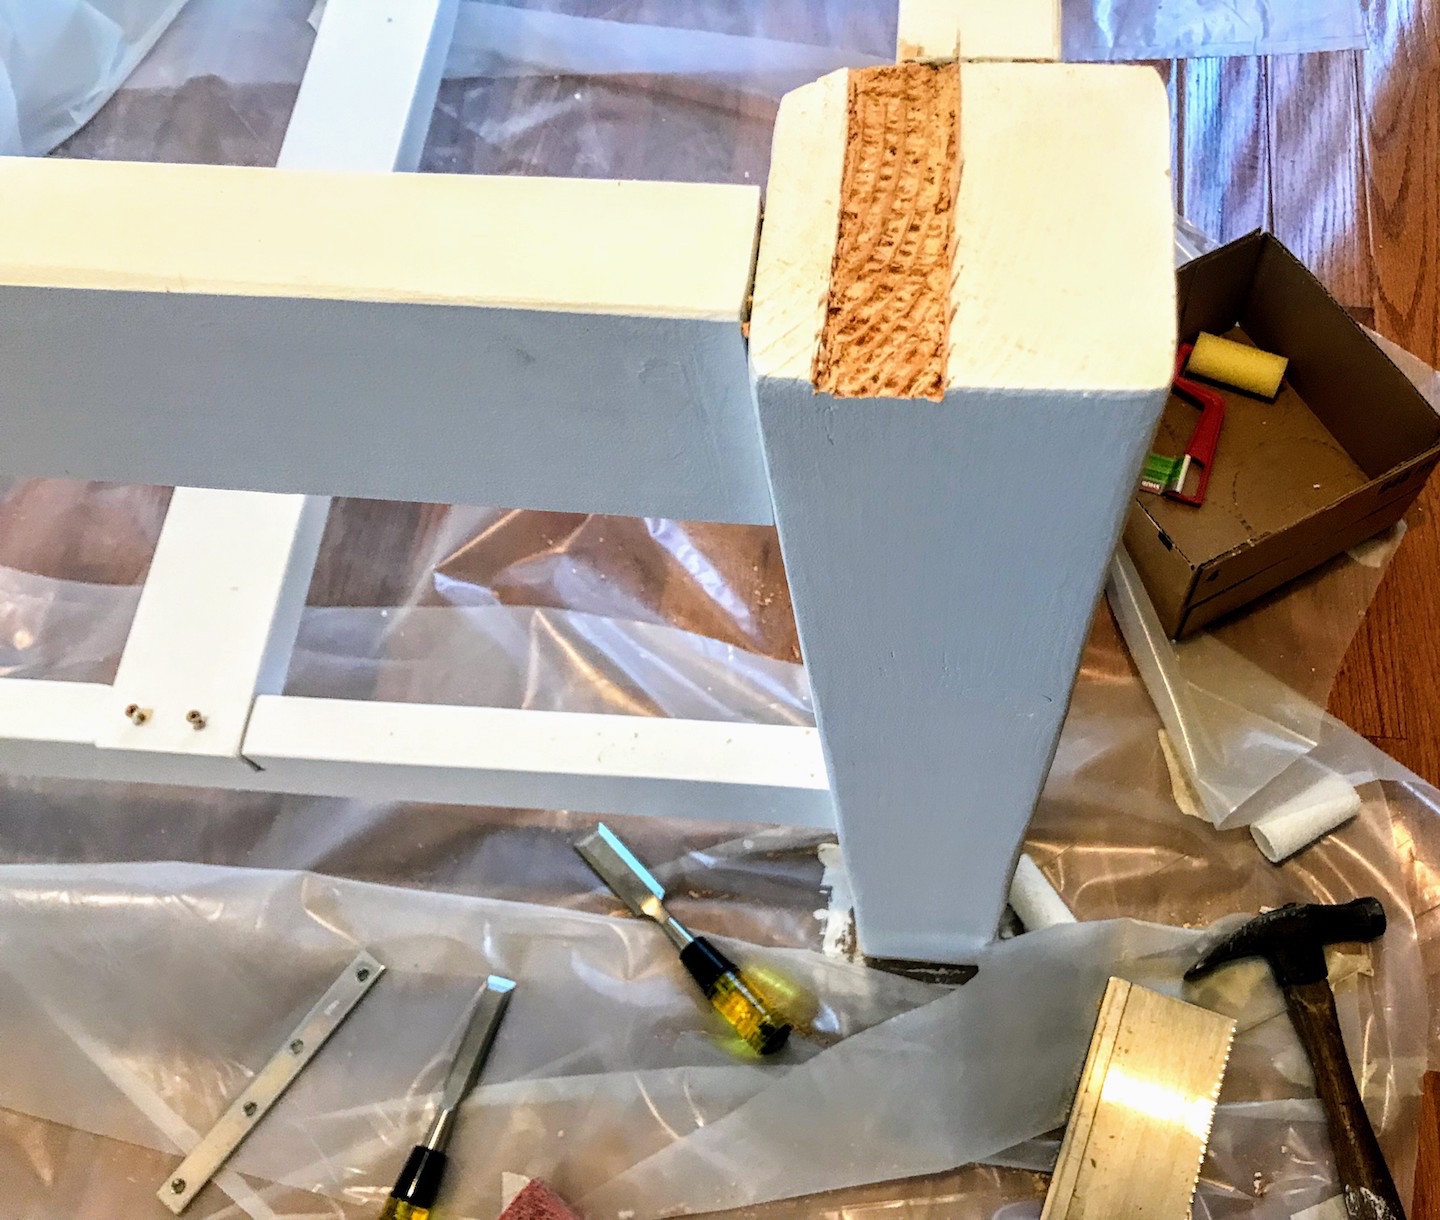
Step 8. Prepare the frame for a "floating" tabletop.
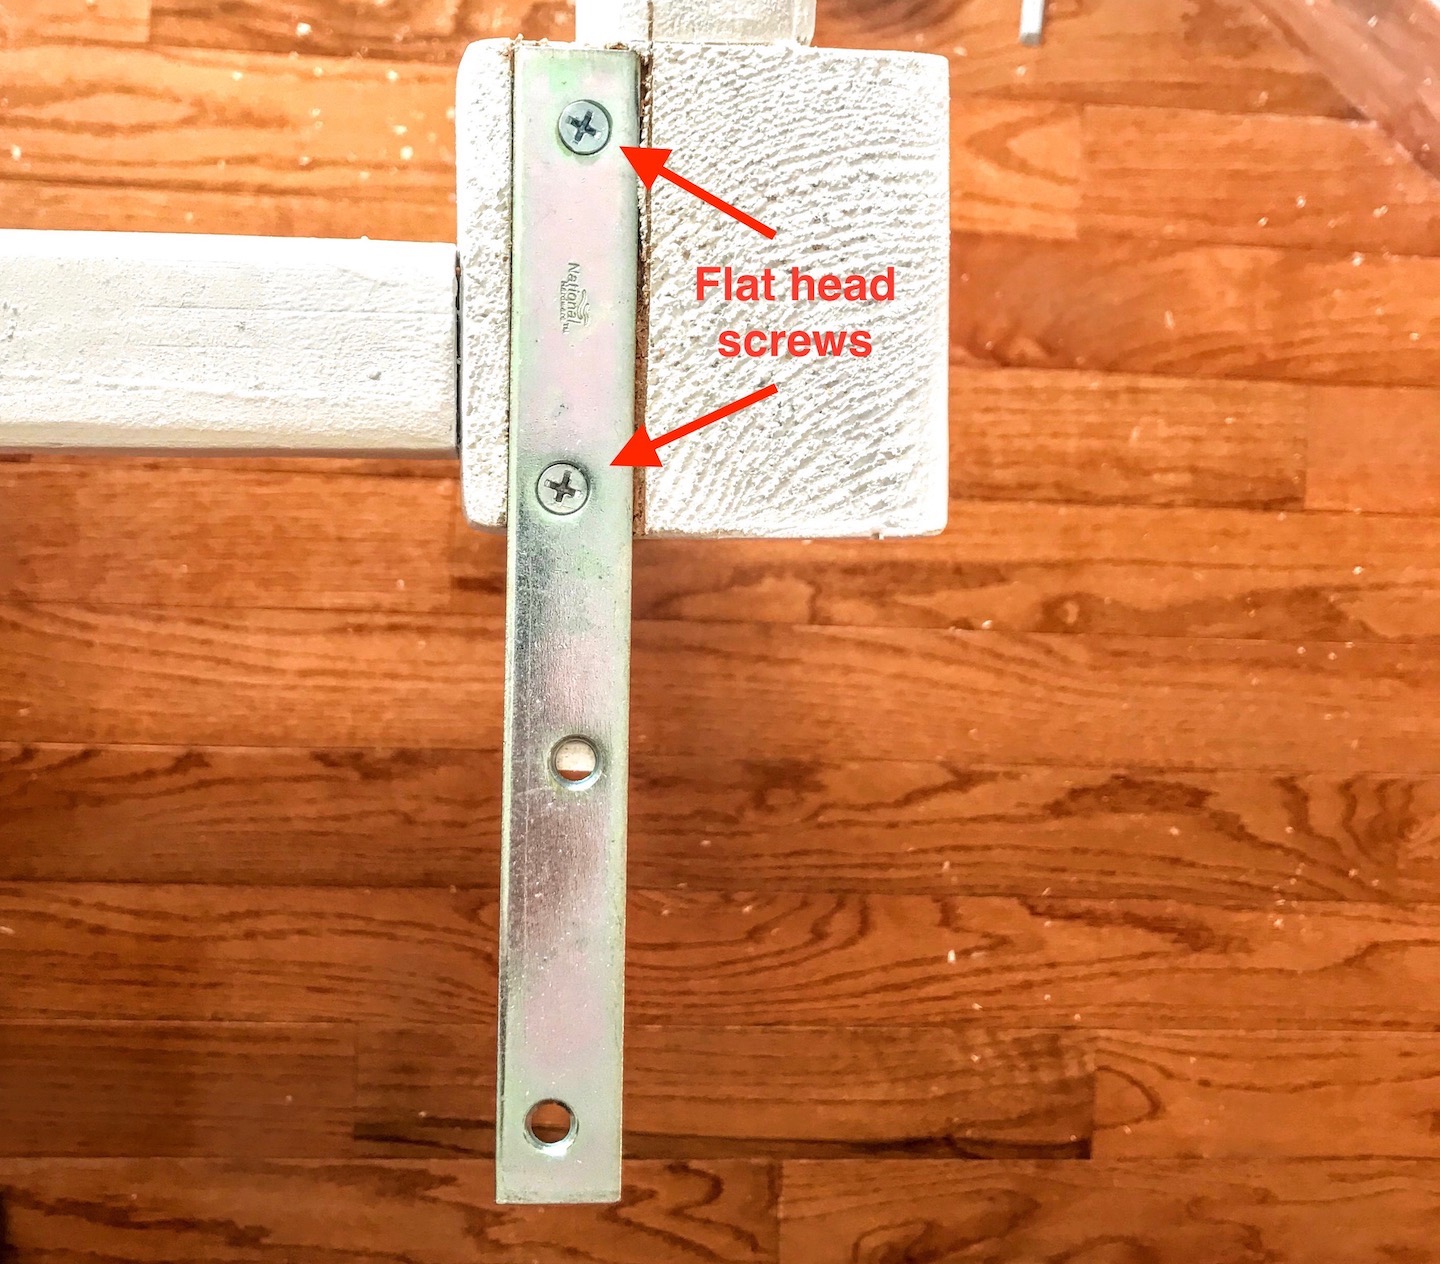
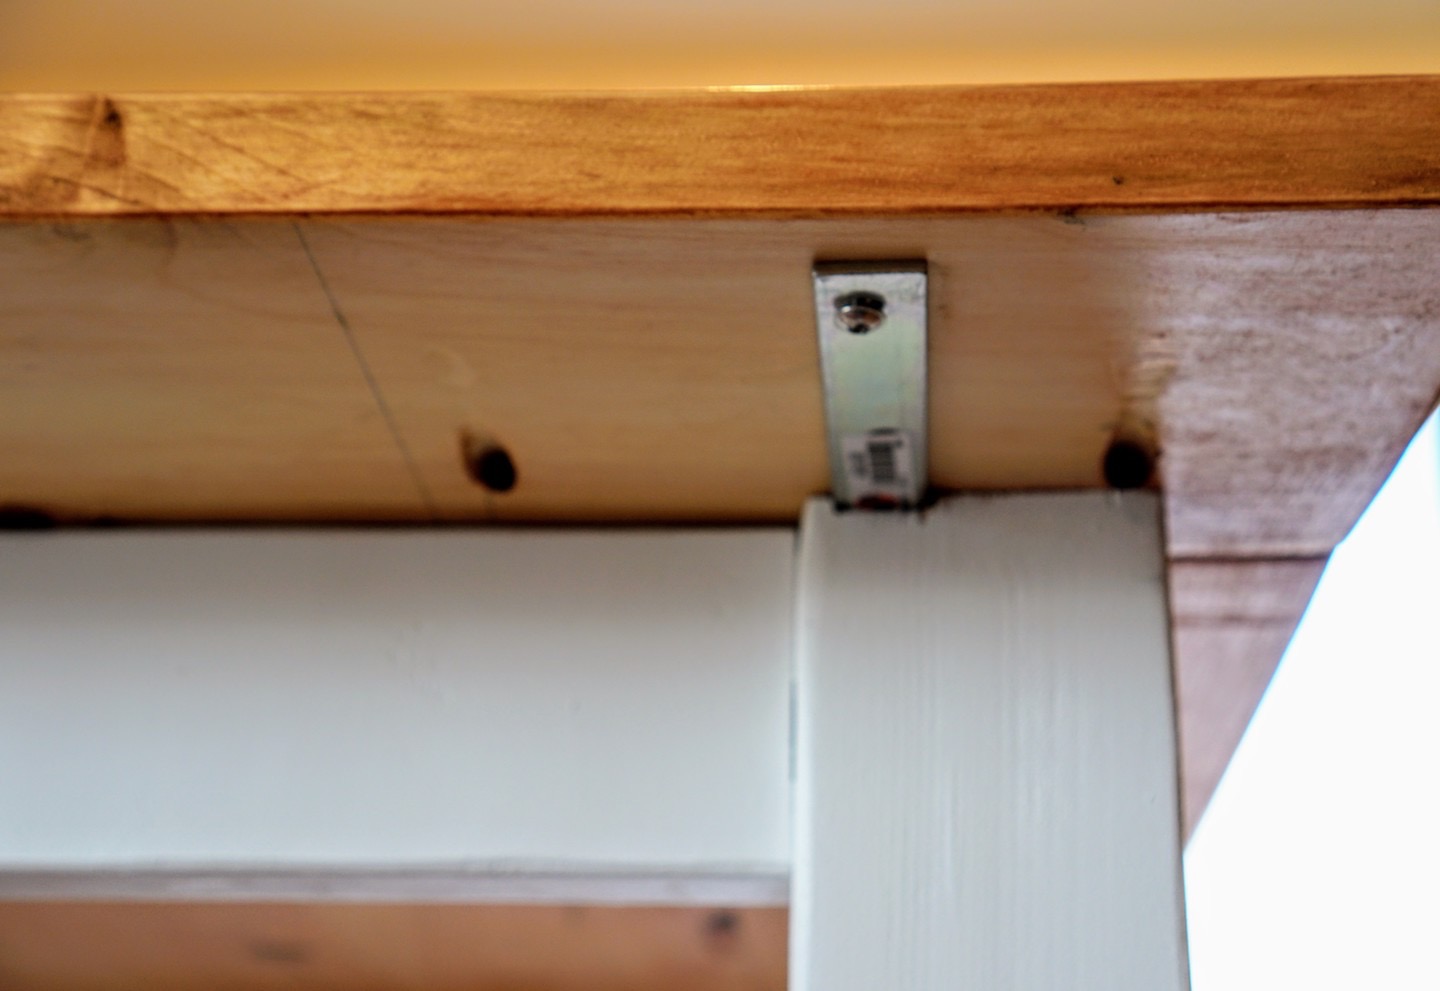
We also want the tabletop to be "floating" so that the frame does not prevent it from moving with changes in humidity. To do this, we do a couple things -- first we install mending plates for the breadboards to rest on and give some additional support. We install these on the top of the 4x4 legs, facing outward. A portion of the breadboard will be supported by the short apron and legs, but a portion will overhang and rest on the mending plates.
To install these mending plates, you must notch out part of the top of the leg to the equivalent depth of the metal plate so that the plate sits flush. Be sure that the notch is neither too deep nor too shallow so the mending plate sits flush:

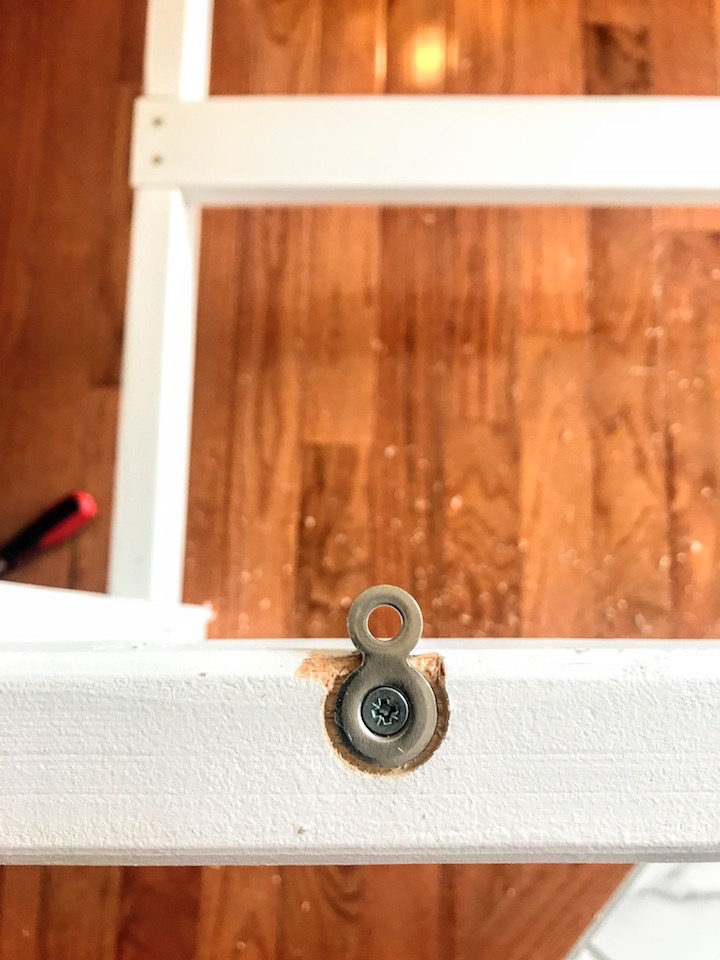
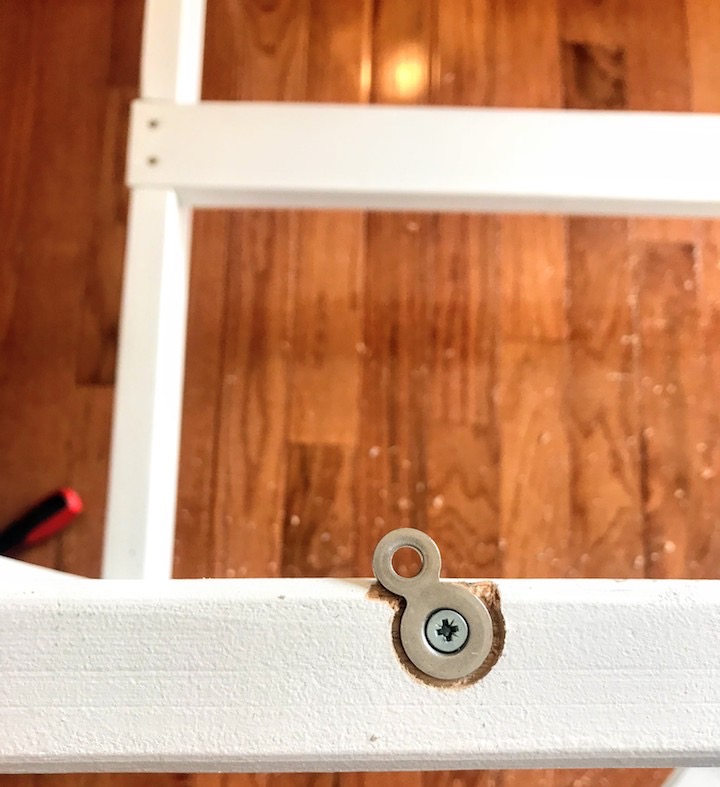
Now, we install figure-eight fasteners on the short and long aprons. One hole exists to screw into the aprons and other to screw into the tabletop after we place it on the frame. The figure-eight will allow the tabletop some movement as they can turn -- just leave the screws a quarter turn or so loose and check that the fastener can move. You can install a couple of these per apron for a total of eight, and remember to make sure the fastener sits flush with the apron.
To install the fasteners, choose a Fostner bit attachment for your power drill that is slightly larger than the fastener diameter. Drill into the wood, only slightly, so that when you place the fastener it sits flush on the top of the apron.
Step 9. Attach the tabletop to the frame.
Finally, we can place the tabletop onto the frame and install the screws. Remember to keep the screws a quarter-turn loose to allow for wood movement; however, tight enough so that the tabletop is sturdy. The same goes for the breadboard and mending plates:
Finishing
The final step! Finishing with polyurethane is necessary to help seal the table from the elements, including humidity. It will help prevent food and liquids from damaging the tabletop and excessive wood movement from humidity. Ideally, you will apply poly to the entire tabletop, including the bottom and all edges of the breadboards and tabletop. While you can choose any polyurethane finish, we recommend a wipe-on poly to make it easier to achieve uniformity.
Discuss
Contact
You can also contact us directly. We'd like to improve this tutorial, so if you find any errors, or have any other comments, please let us know: